Install Technitium
Technitium is a DNS Server on steroid, possibly trumping Pi-Hole and Adguard in terms of deployment simplicity and advanced configuration.
Since this is a DNS server, you can create your own local domain that is resolving to your various unRAID services using names like radarr.unraid.local instead of IP and port such as 192.168.1.26:8686. The features that Technitium offers is full packed and goes beyond that usage.
Quick Info
| Web Console | http://<UNRAID_IP>:5380 |
|---|---|
| Default Admin Username | admin (cannot be changed) |
| Password | set when accessing UI for the first time |
| Official Website | https://technitium.com/dns/ |
Alternatives
AdGuard, PiHole, Blocky
Install on unRAID
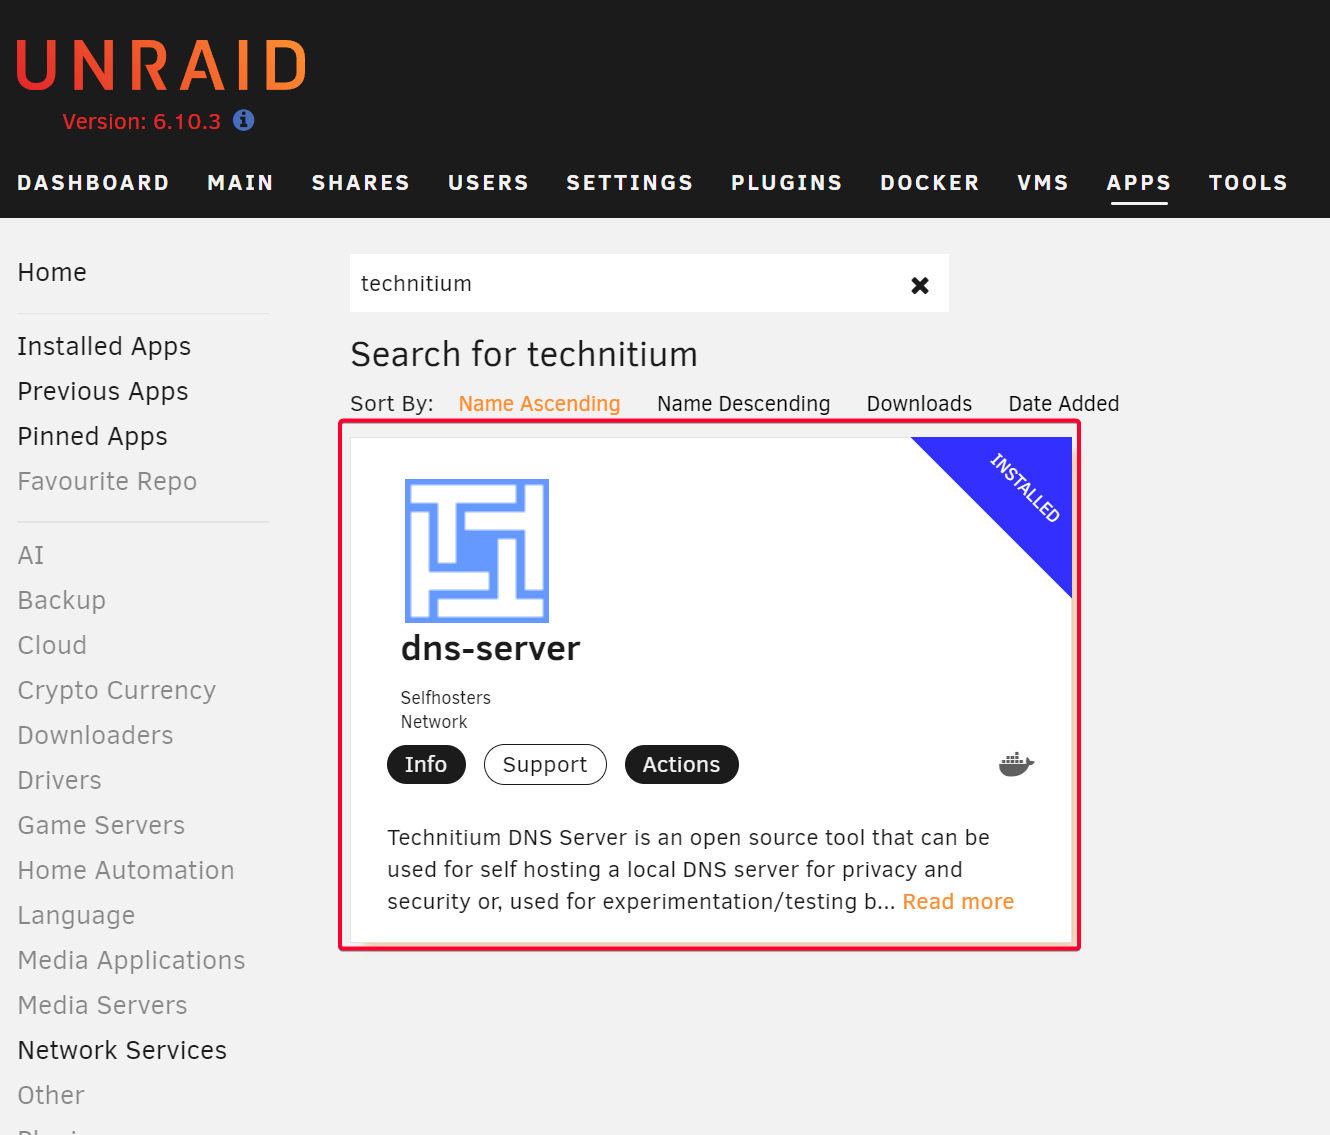
Search for technitium on unRAID app.
Notes
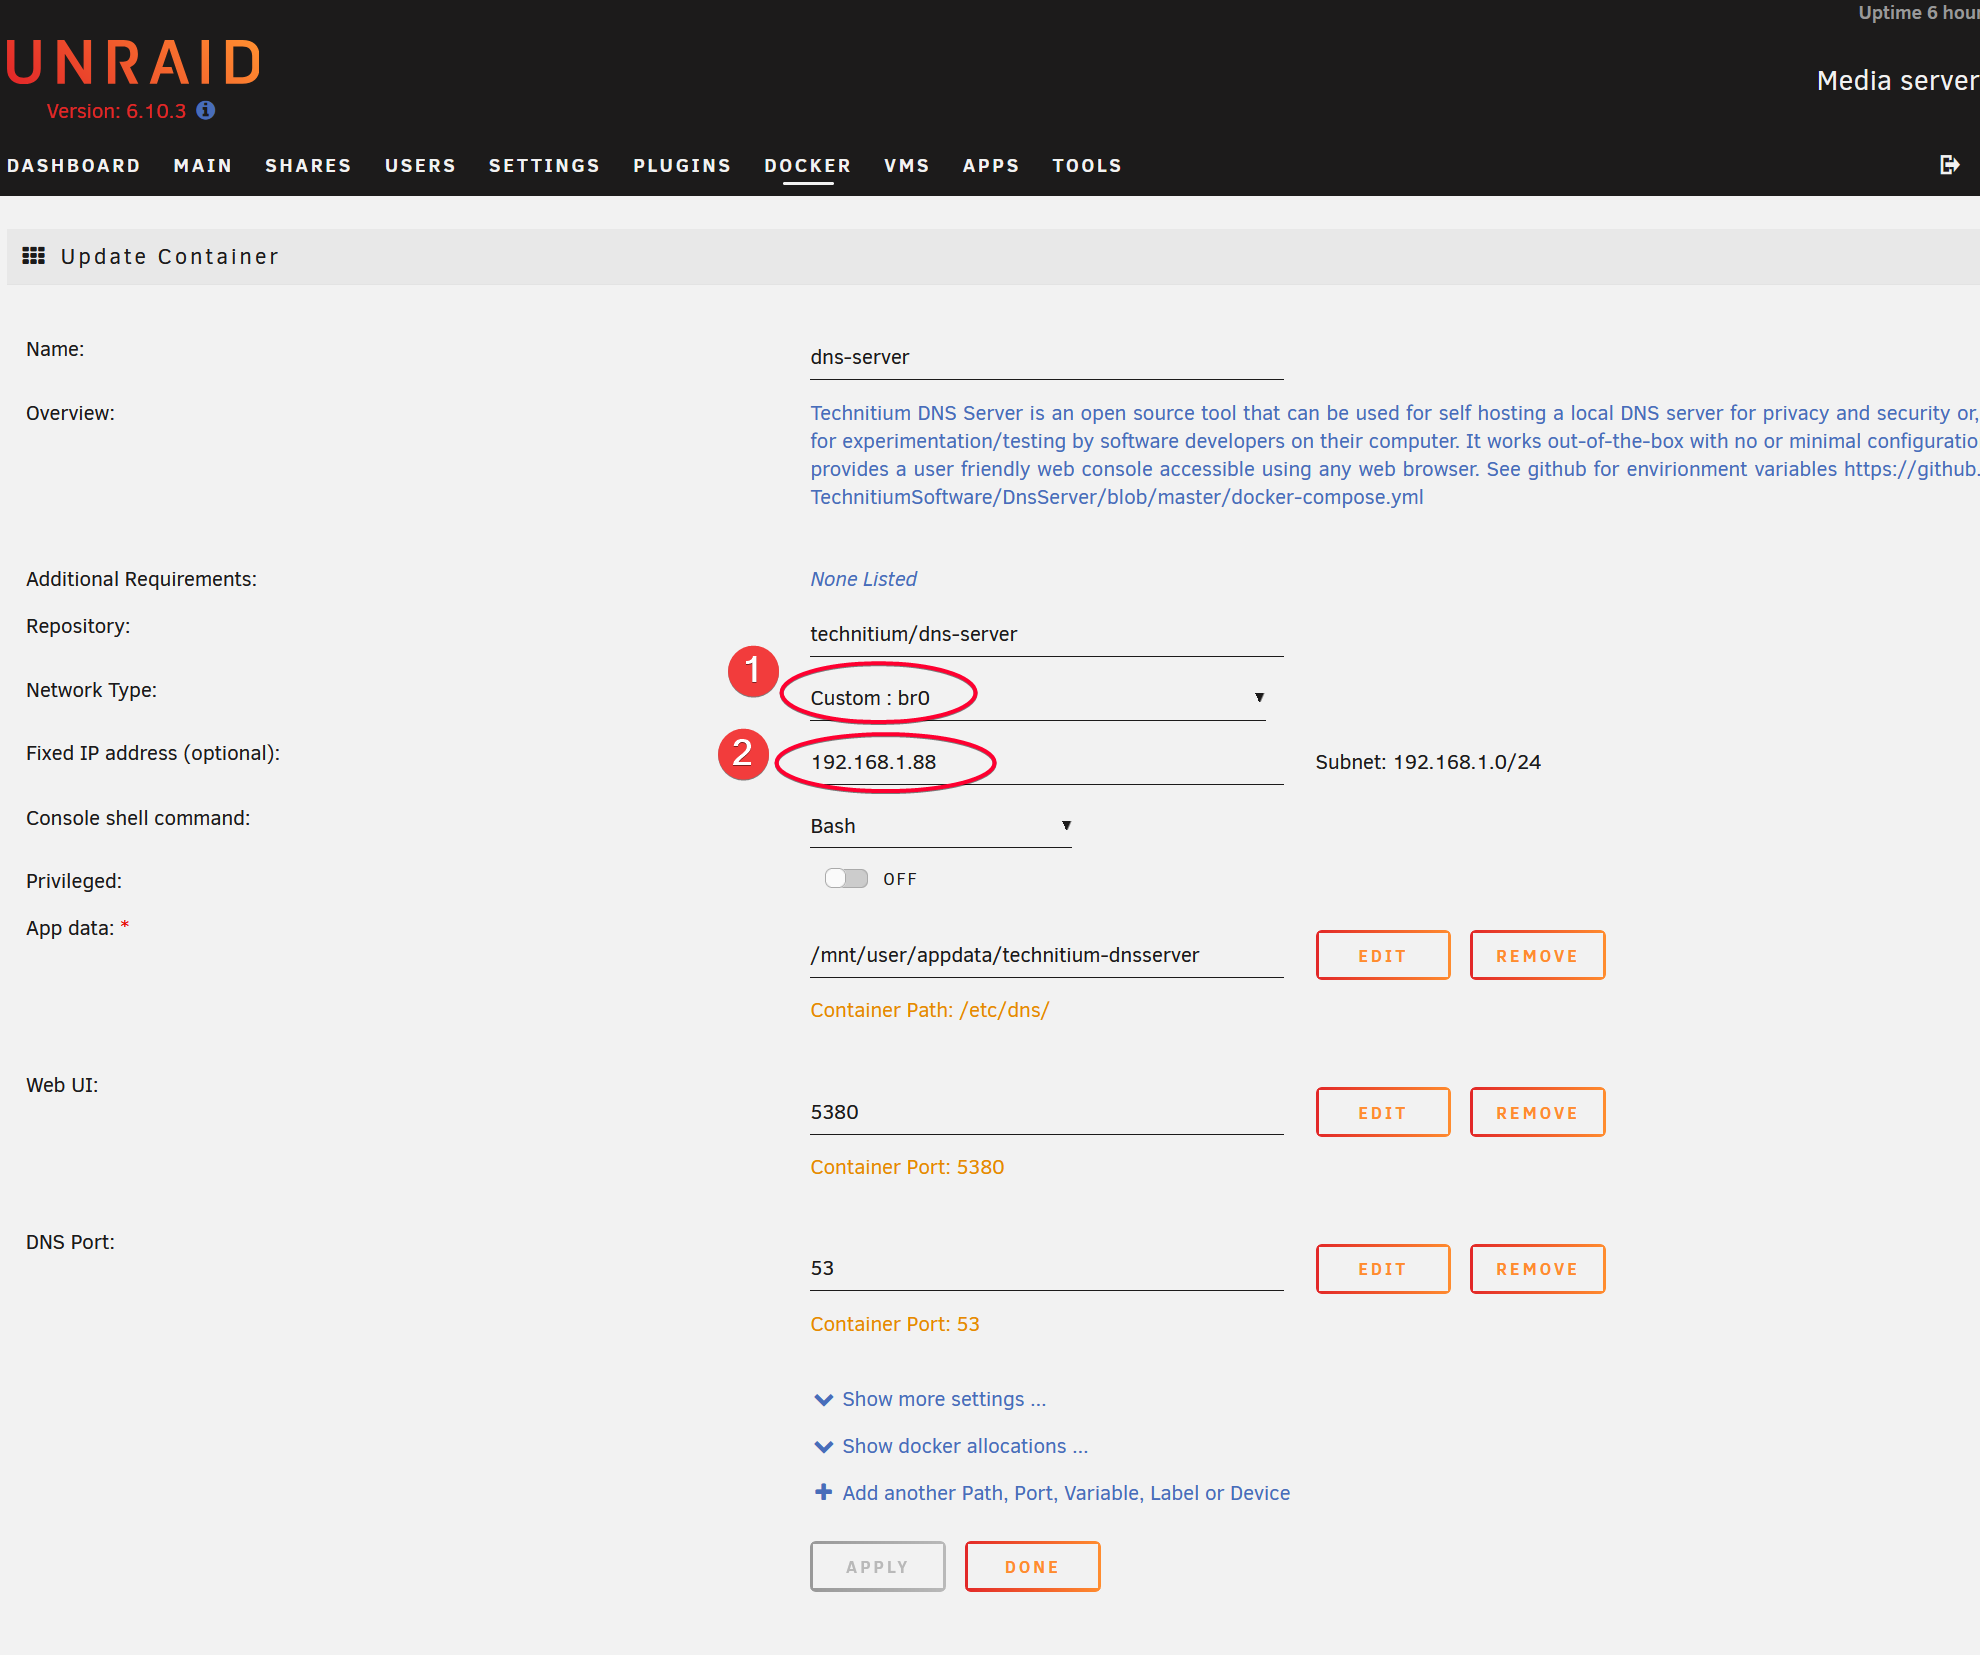
You might have to choose br0 as the Network Type instead of the default or bridge network. If you run VM, the hypervisor would already run dnsmasq service, therefore used up port 53 on unRAID server LAN IP.
I manually assign it to be 192.168.1.88 which is not used by any other devices in my home LAN. My Netgear Orbi LAN network is set to 192.168.1/24 subnet.
Web UI
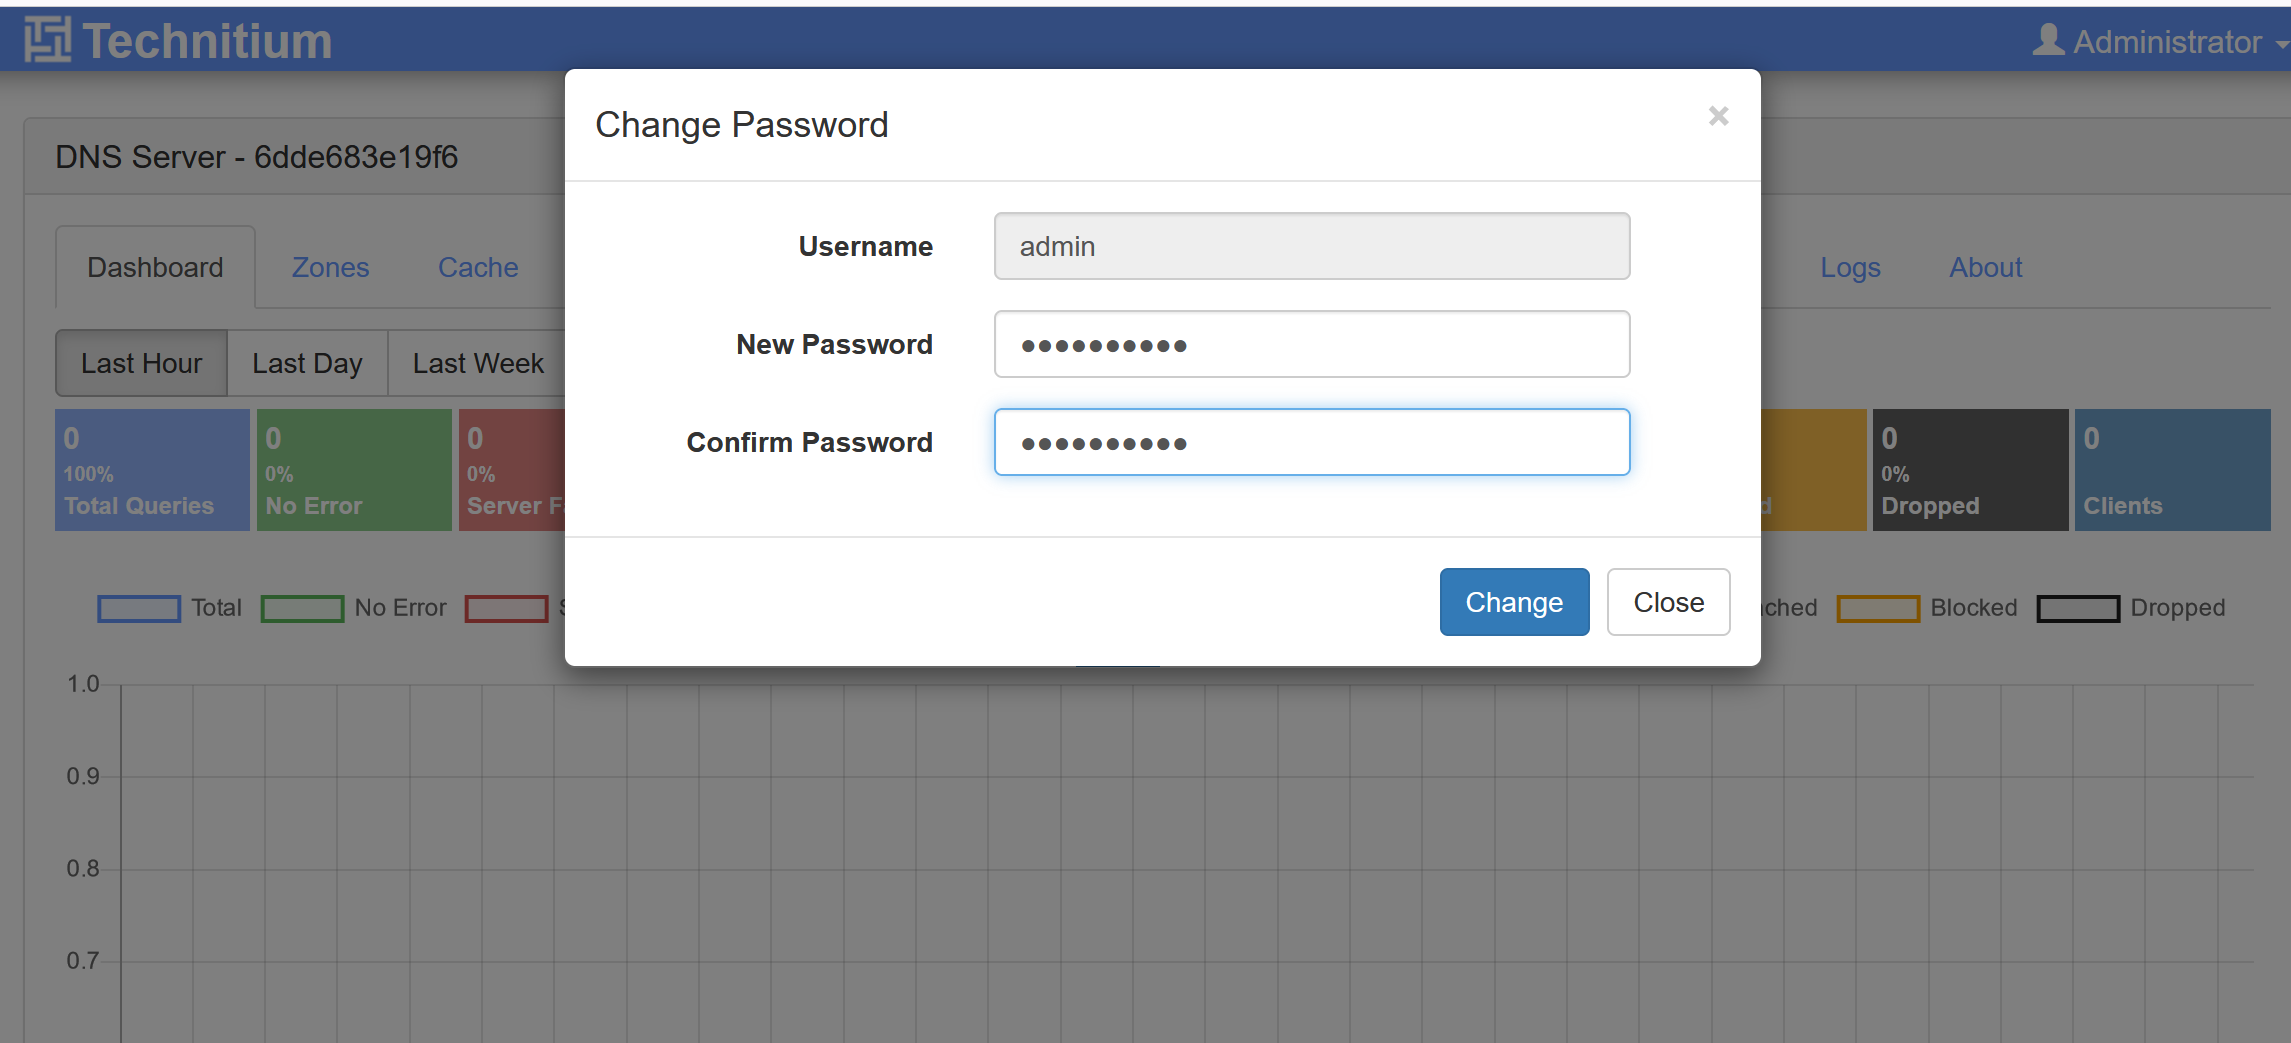
Open up the web UI @ http://<UNRAID_IP>:5380 and you'll be asked to set up admin password.
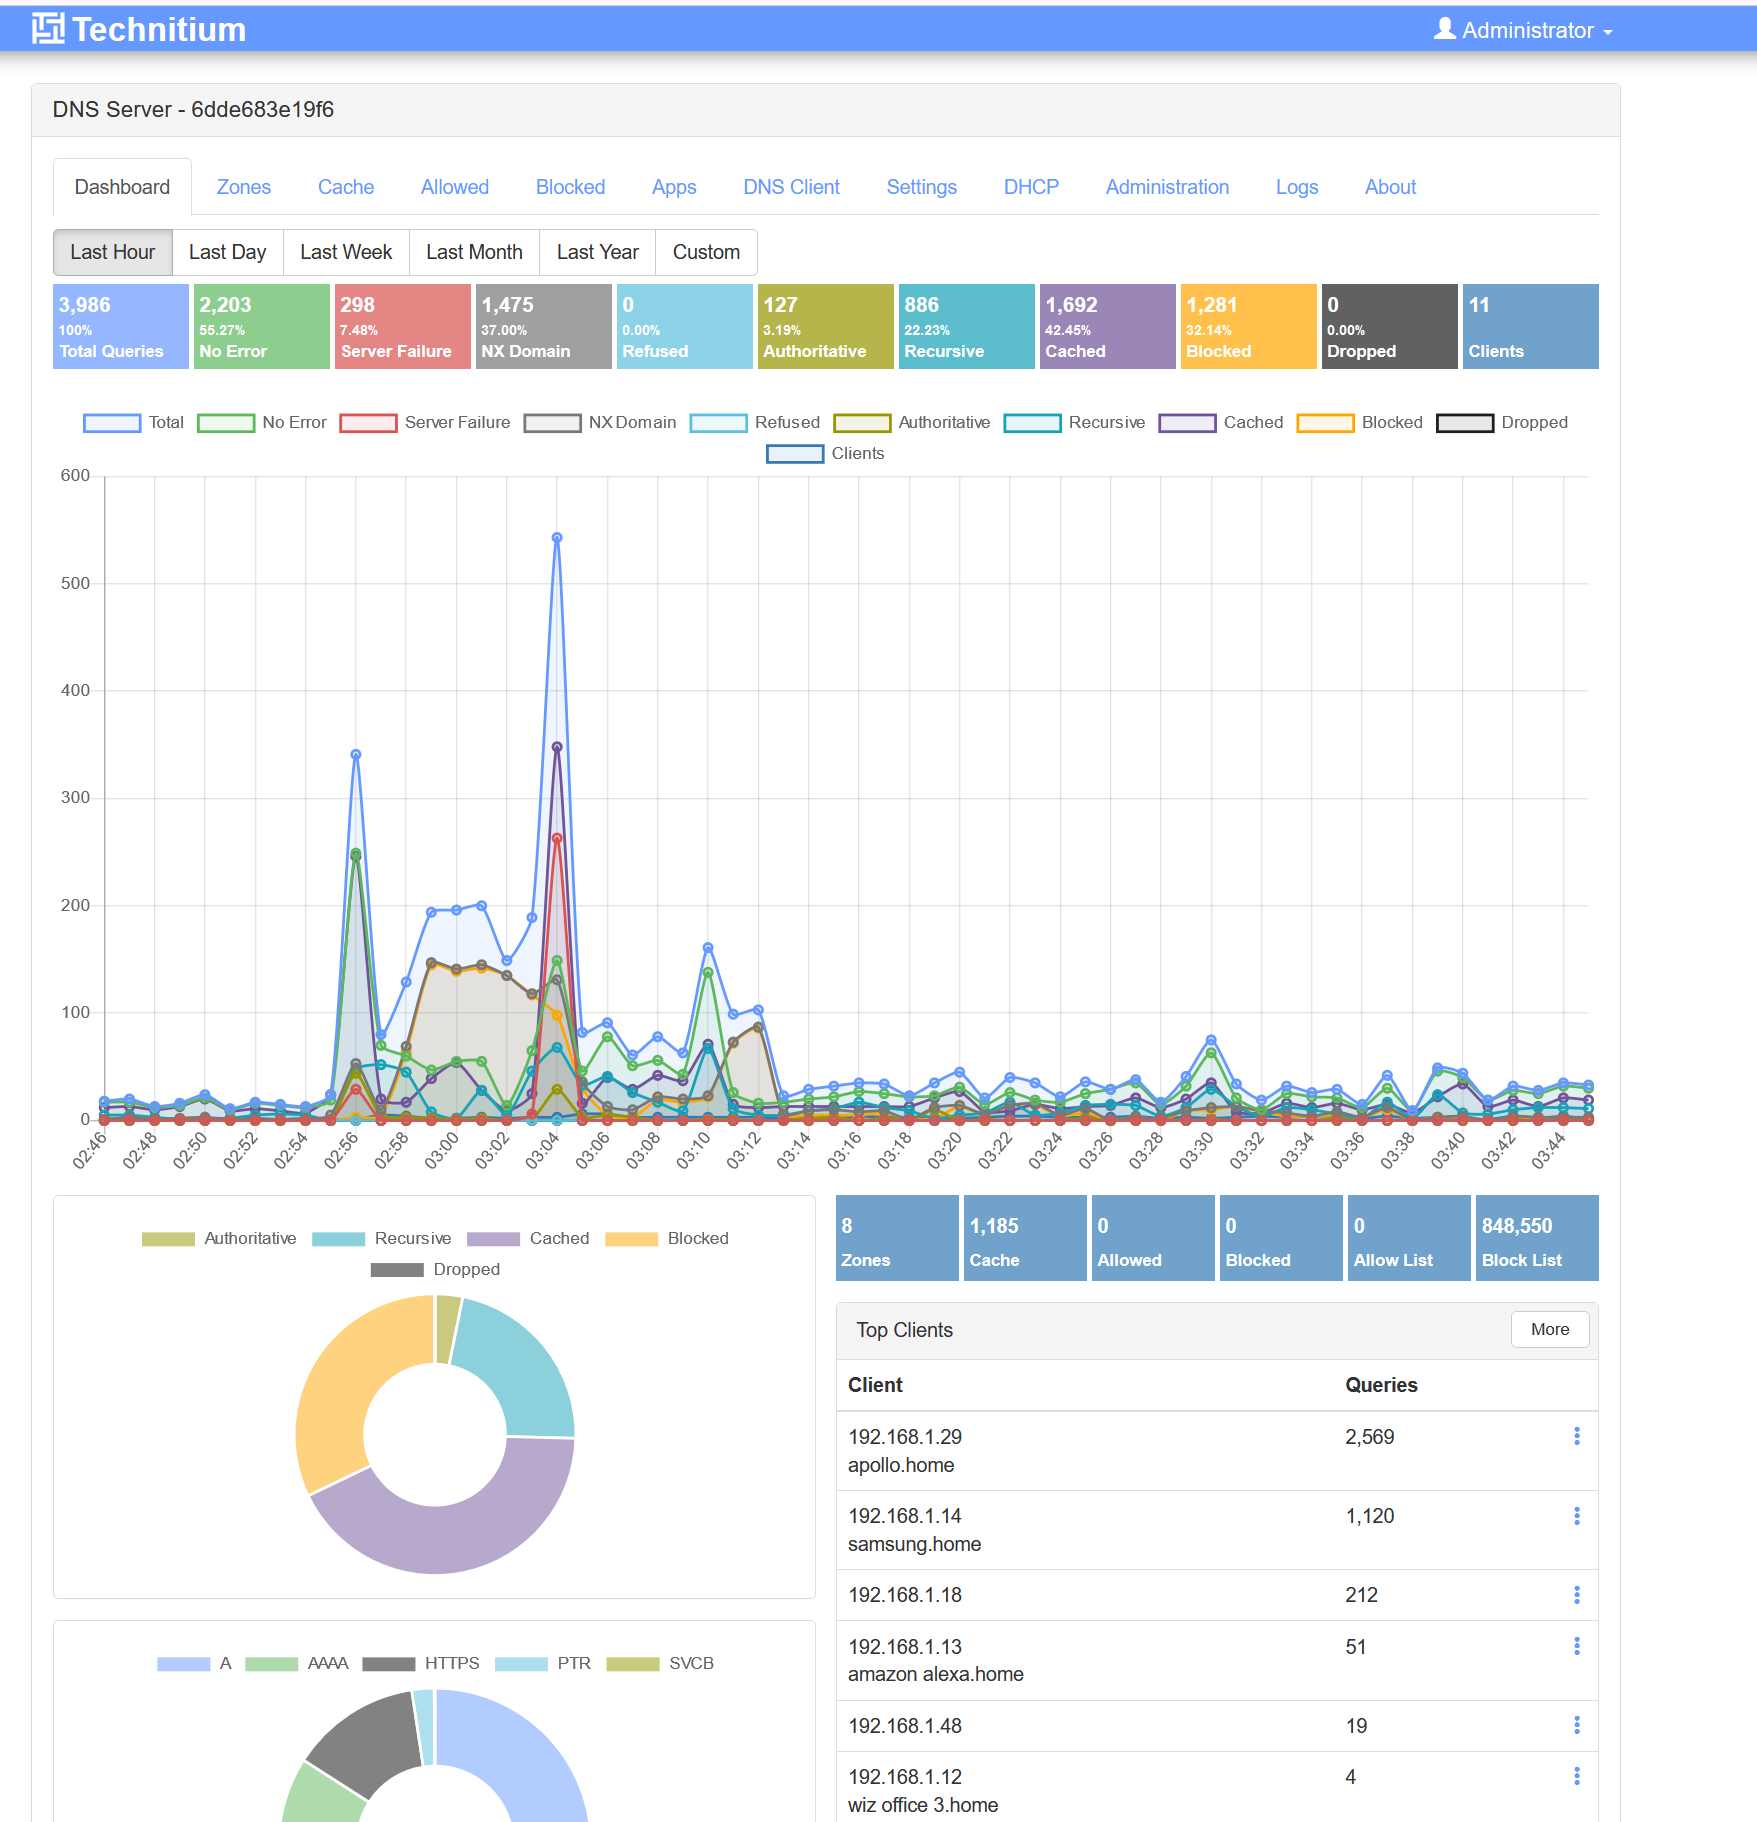
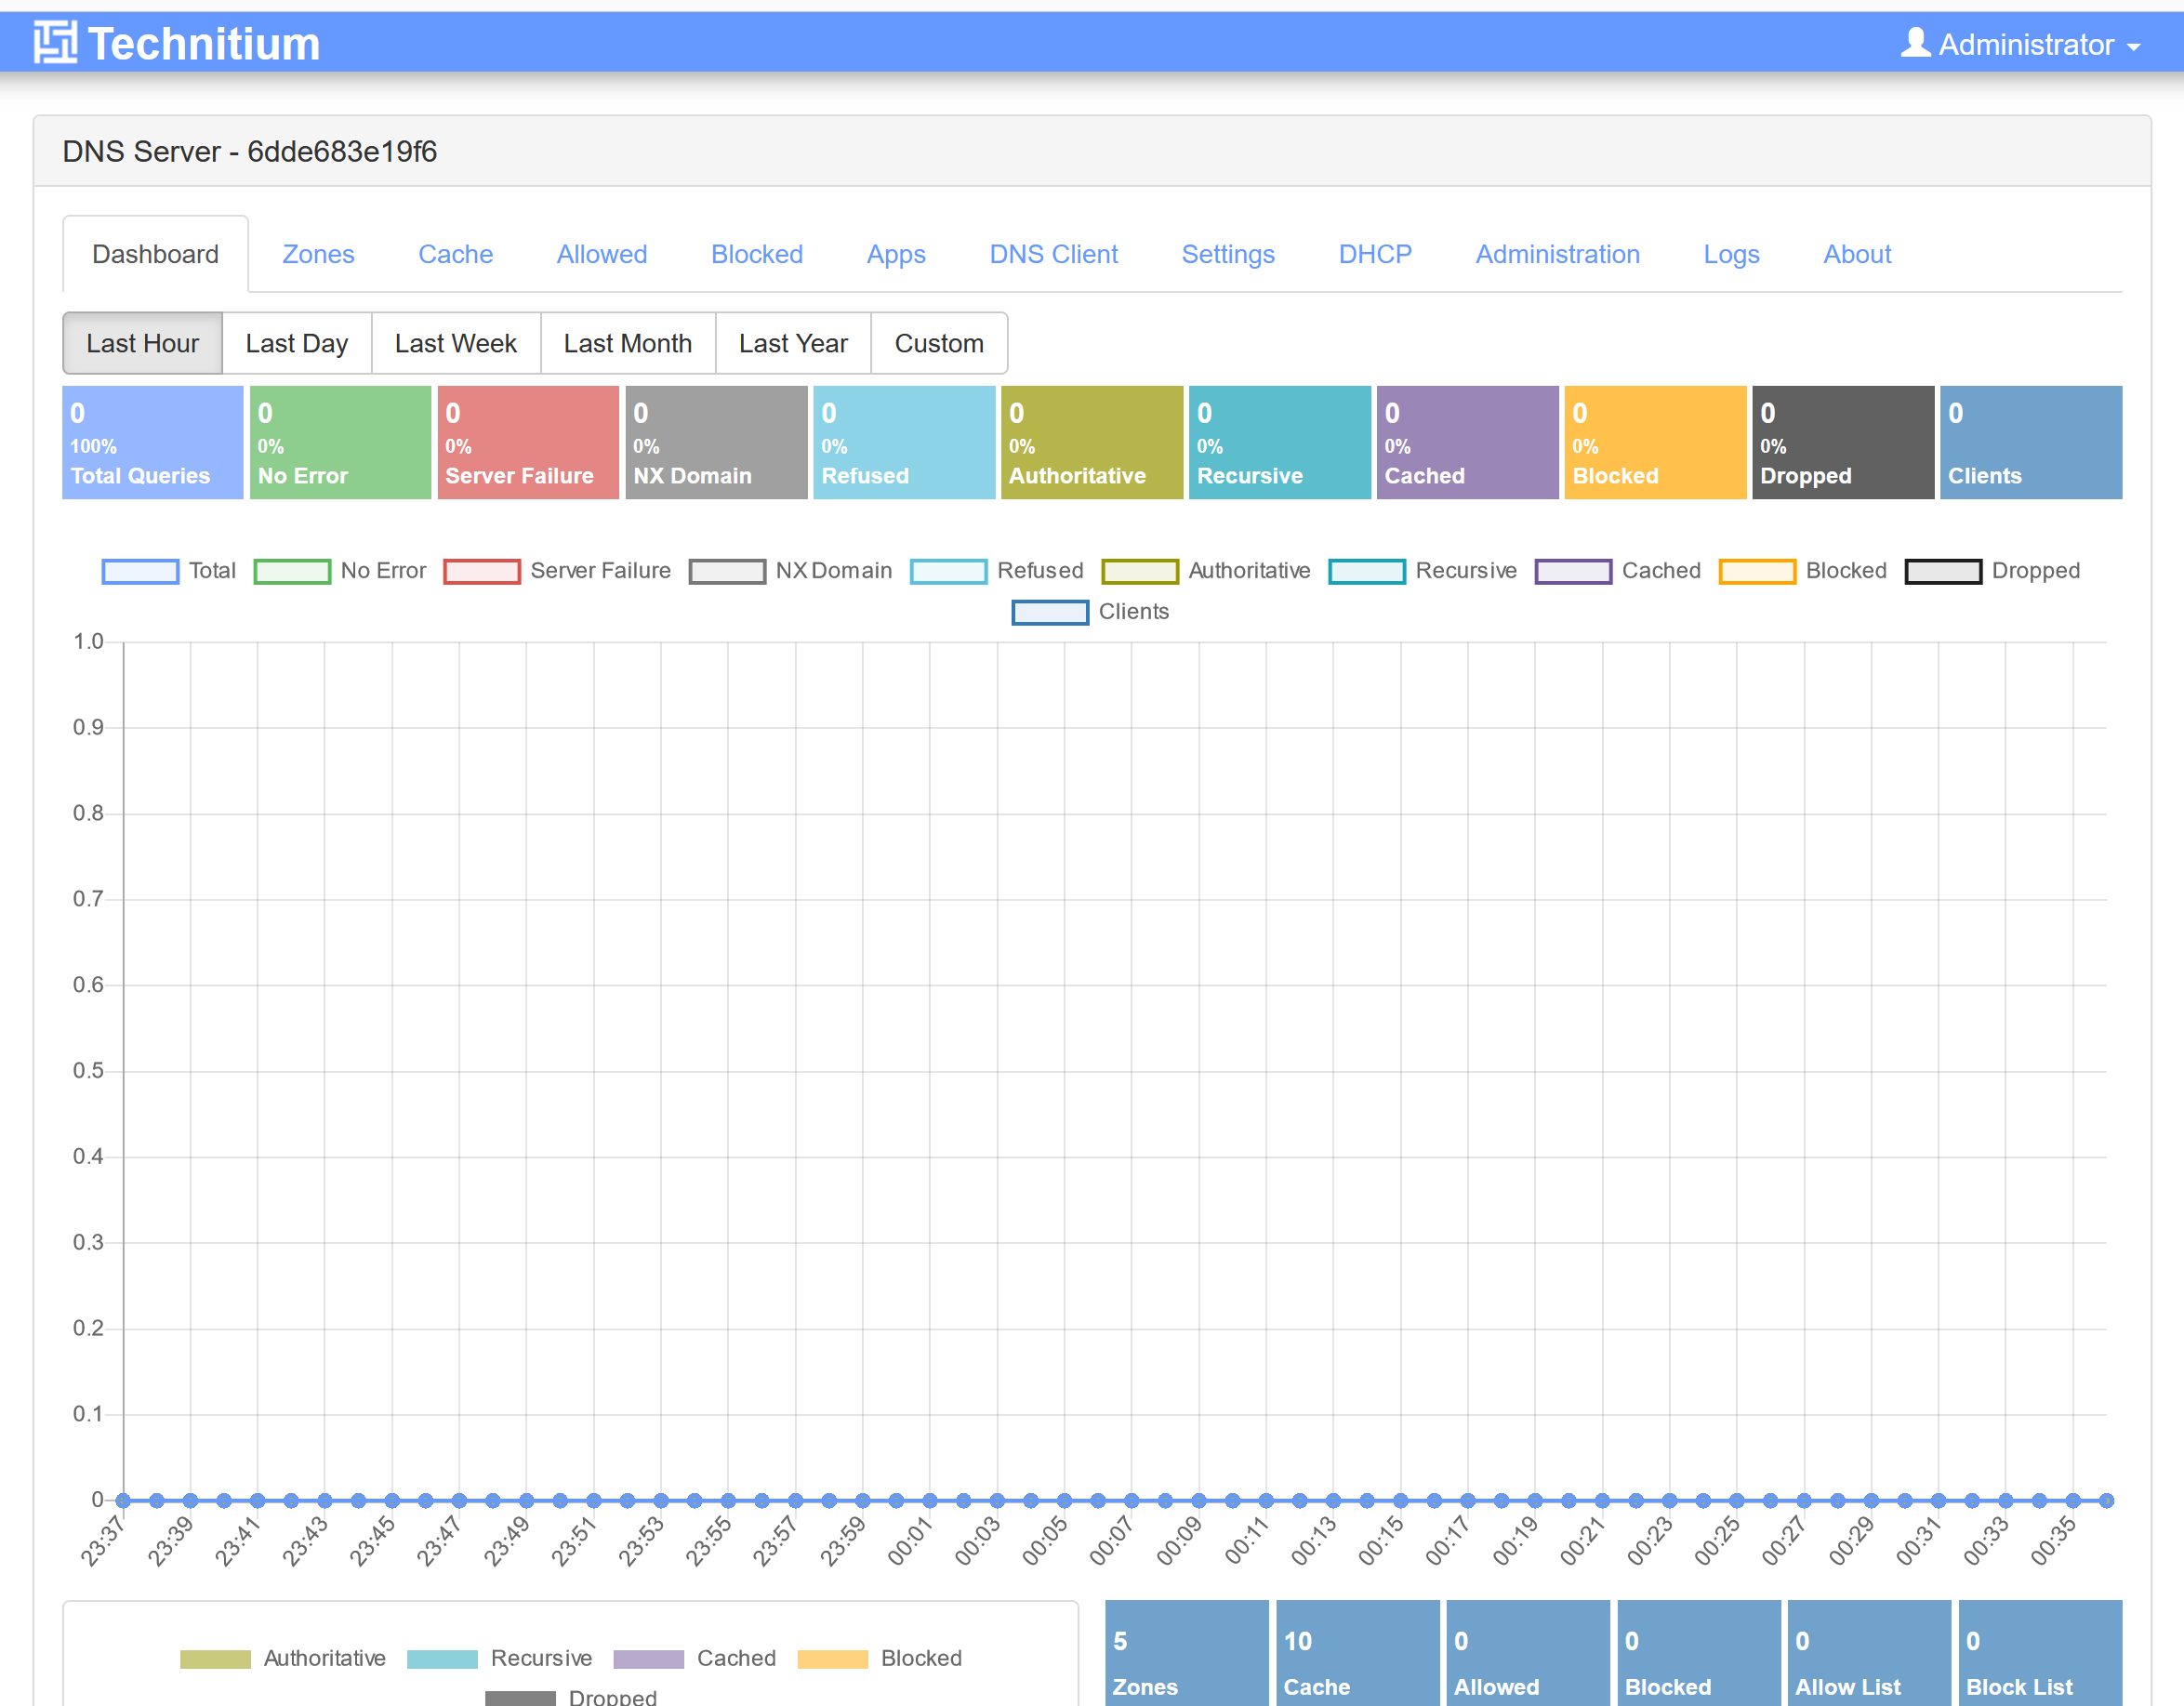
Dashboard
Setup PC to Use Technitium DNS Server
In order to use the Technitium DNS server, you will need to point your PC or any devices to use Technitium DNS server as their primary DNS server. Most devices connected to your router would already obtained their IP address and DNS info via DHCP, where the DNS server is usually the router DNS server that points to your ISP DNS server, so we have to override that settings.
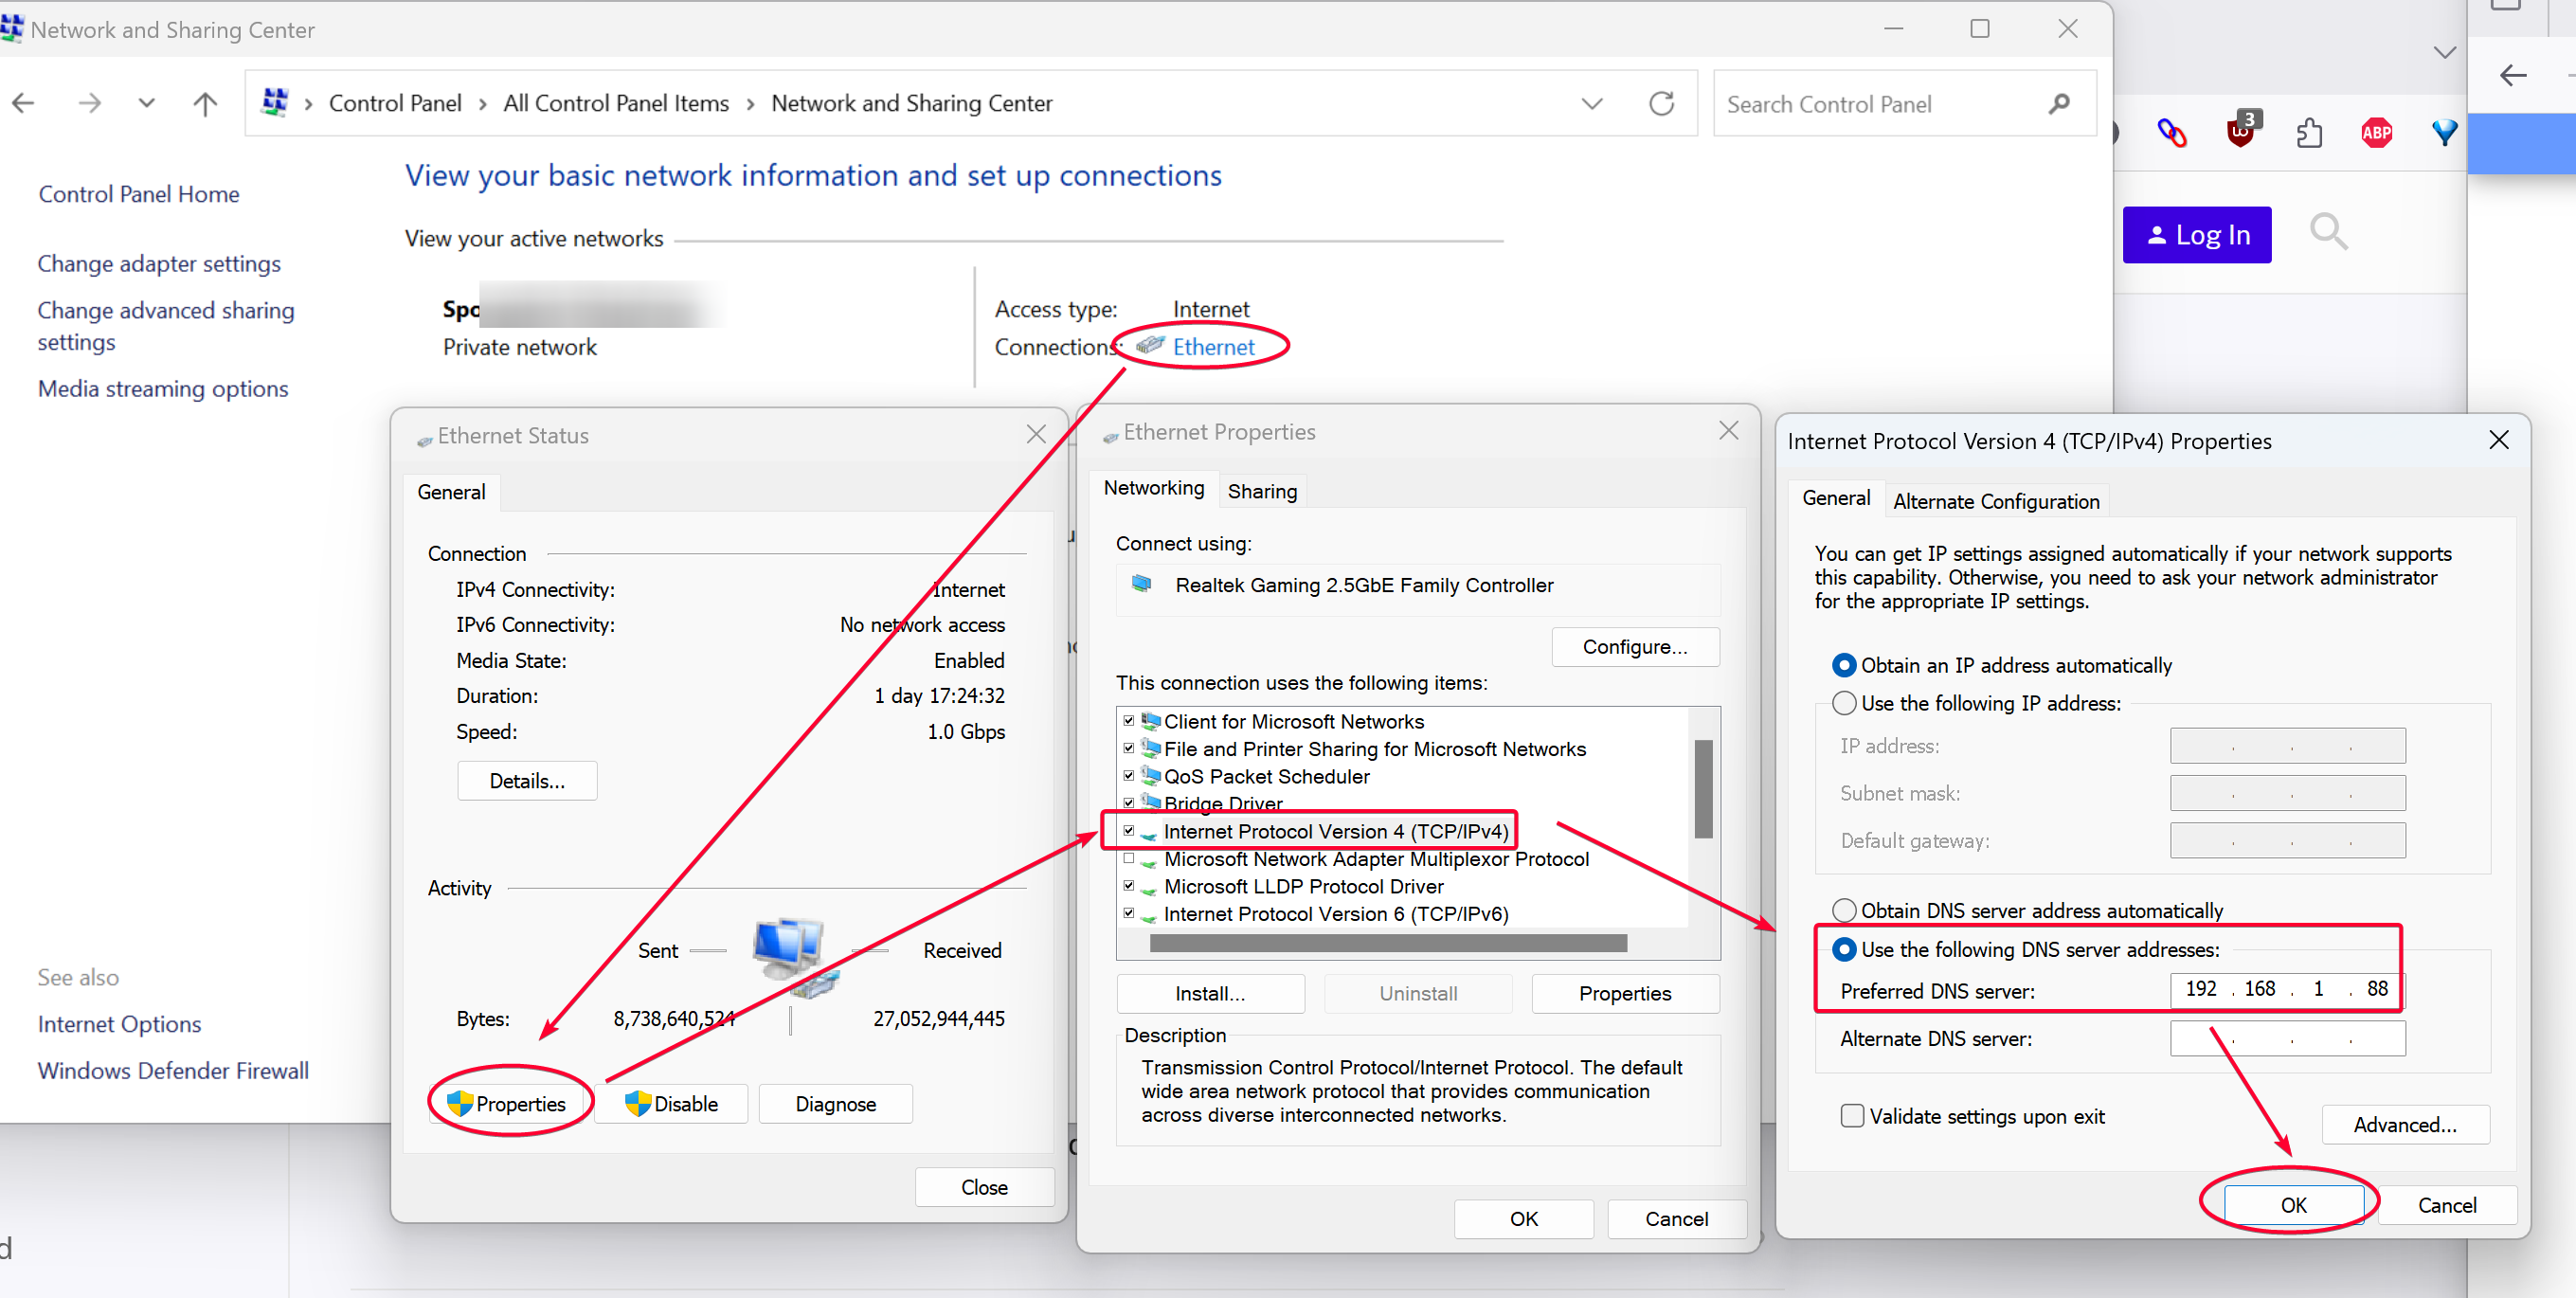
For Windows PC, open Control Panel then modify the DNS server in your network interface to point to the IP running Technitium.
Enable DNS-Over-HTTPS (DoH)
Technitium DNS server has a pretty nifty feature allowing you to forward any DNS request over HTTPS (DoH) to a list of pre-configured DNS servers that support that protocol. DoH is preferred to protect your ISP from sniffing your DNS query. DNS queries took place even before your session with the HTTPS website is established. So even though your ISP won't be able to look any data sent between your PC and the HTTPS server, they will still know which website you try to visit by inspecting the DNS queries, which is plaintext if it's not DoH or DoT.
See https://blog.technitium.com/2018/12/configuring-dns-over-tls-and-dns-over.html for more details.
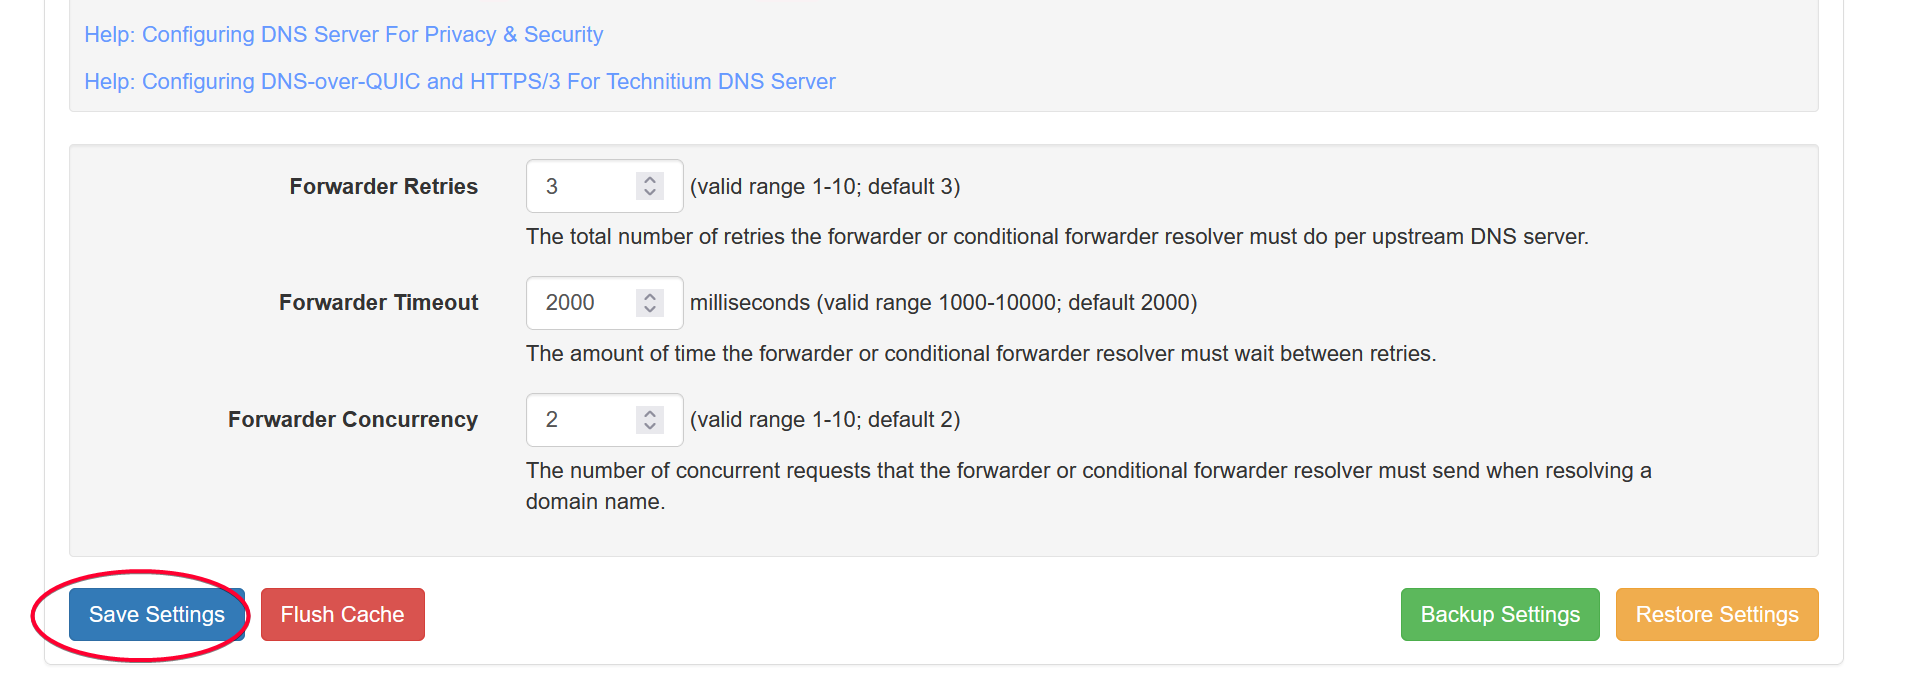
To configure a DNS forwarders, go to Settings > Proxy & Forwarders. I chose Cloudflare 1.1.1.1 DNS server that support DoH to forward my DNS queries.
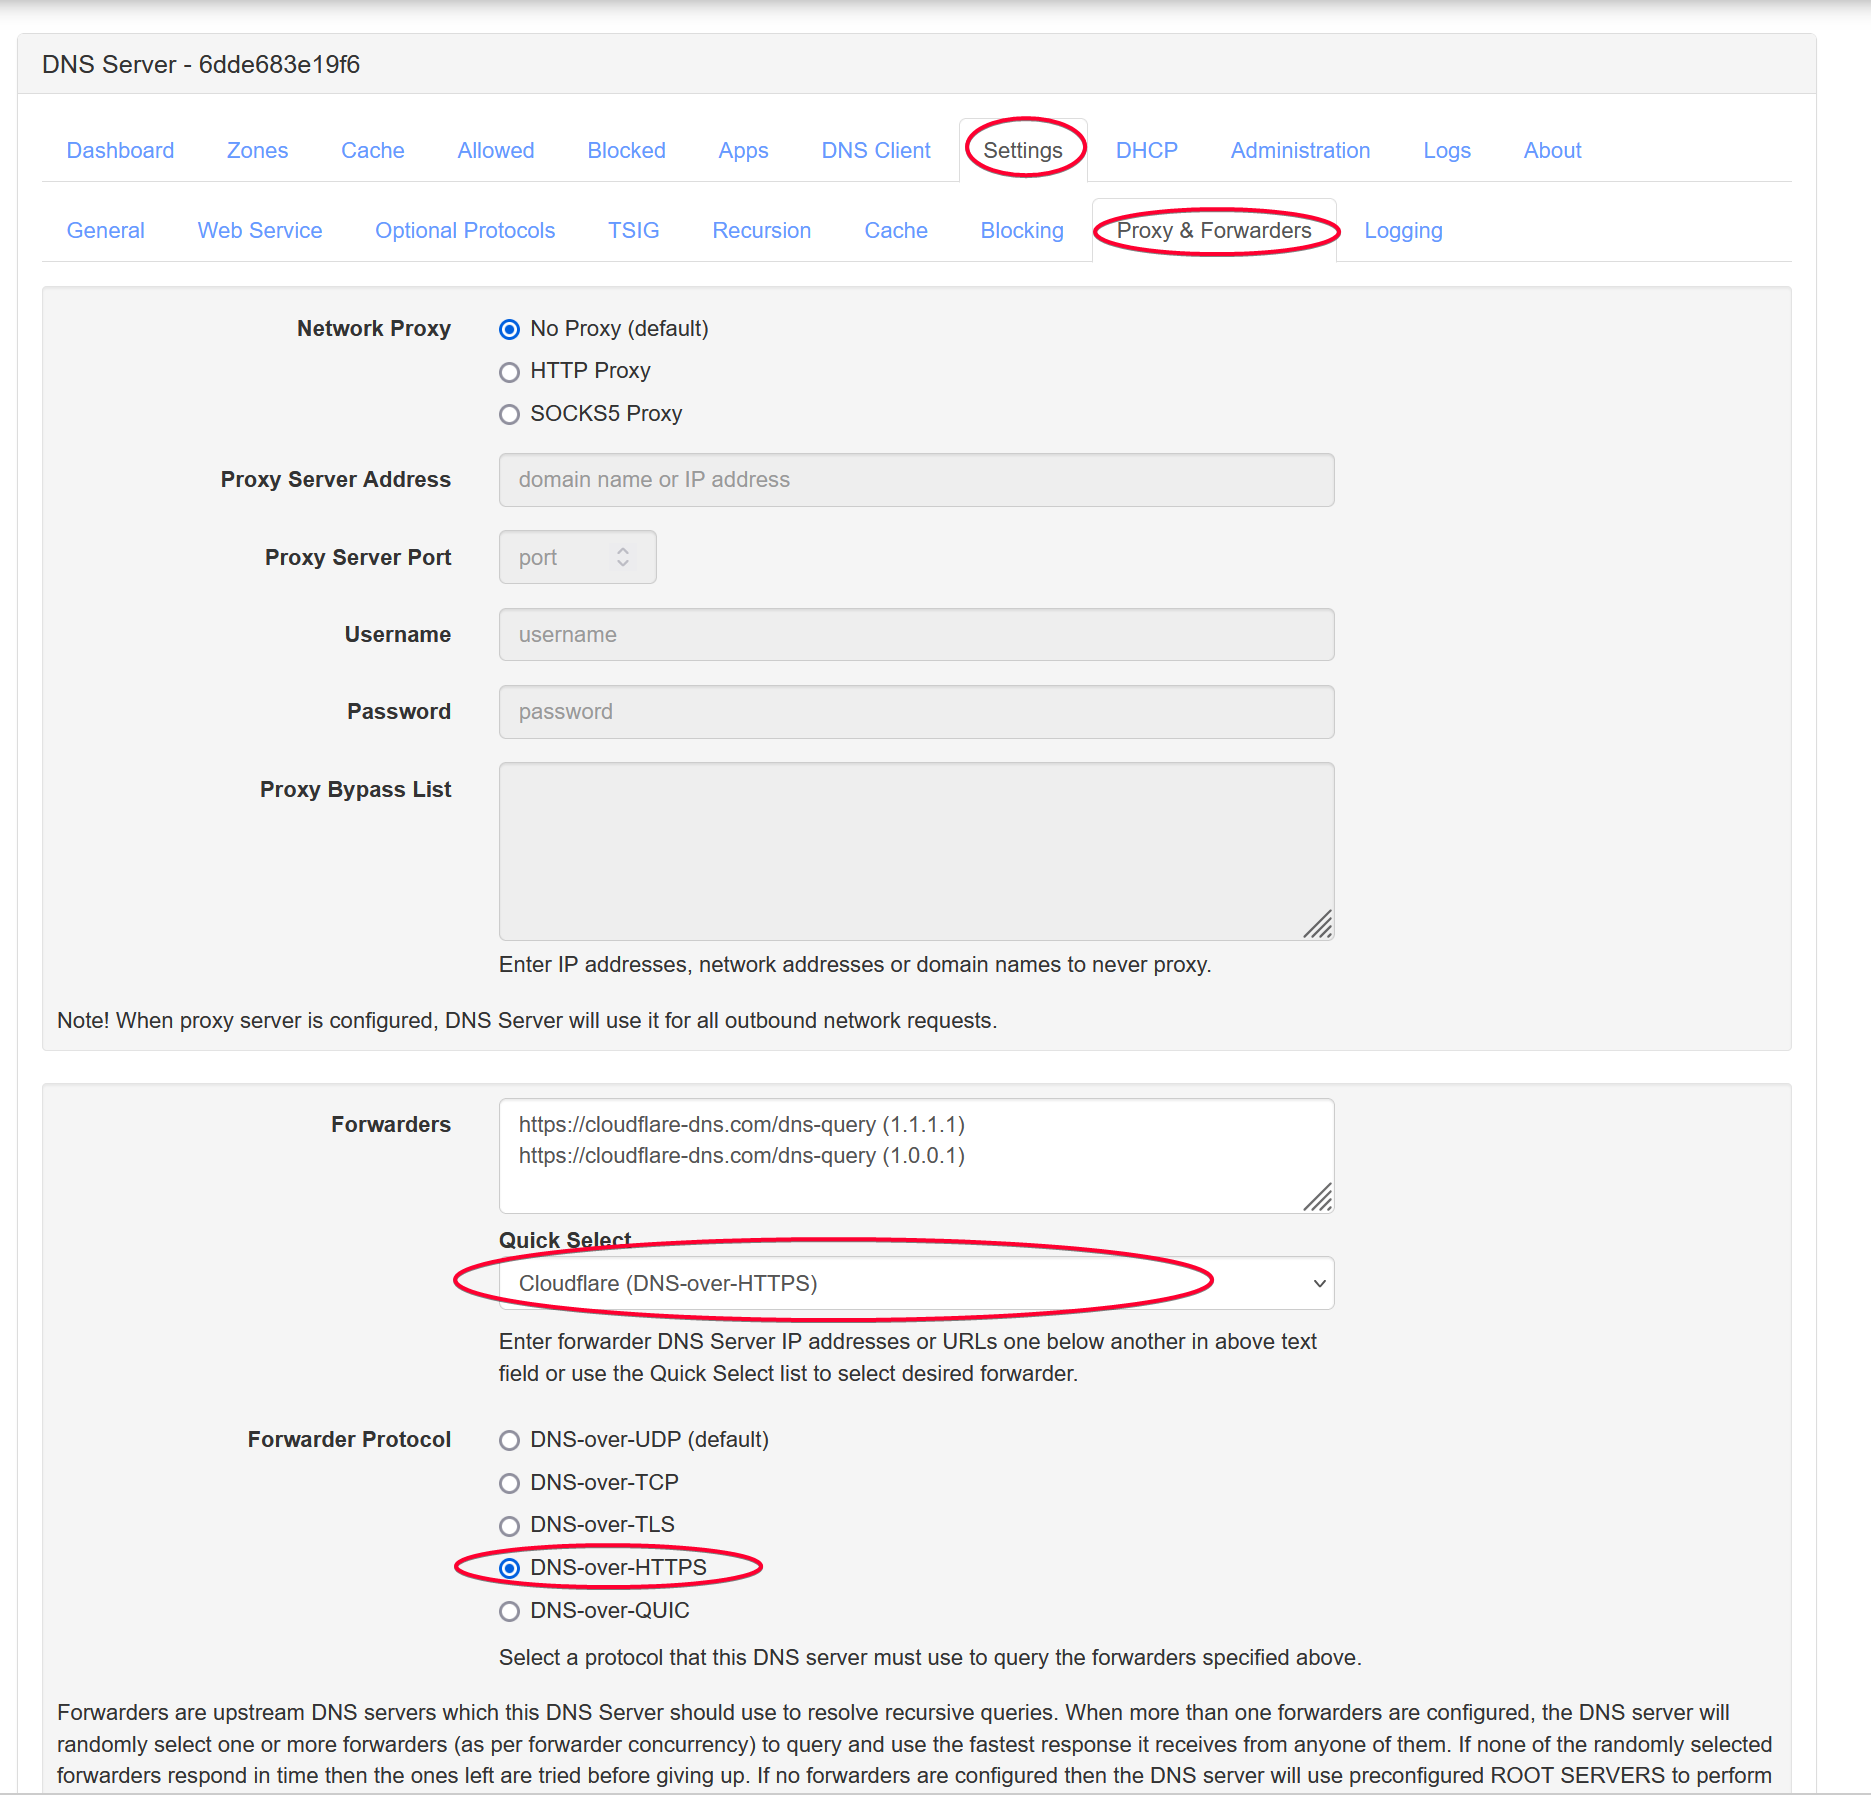
Click the Save Settings button on the bottom left when done.
Verify
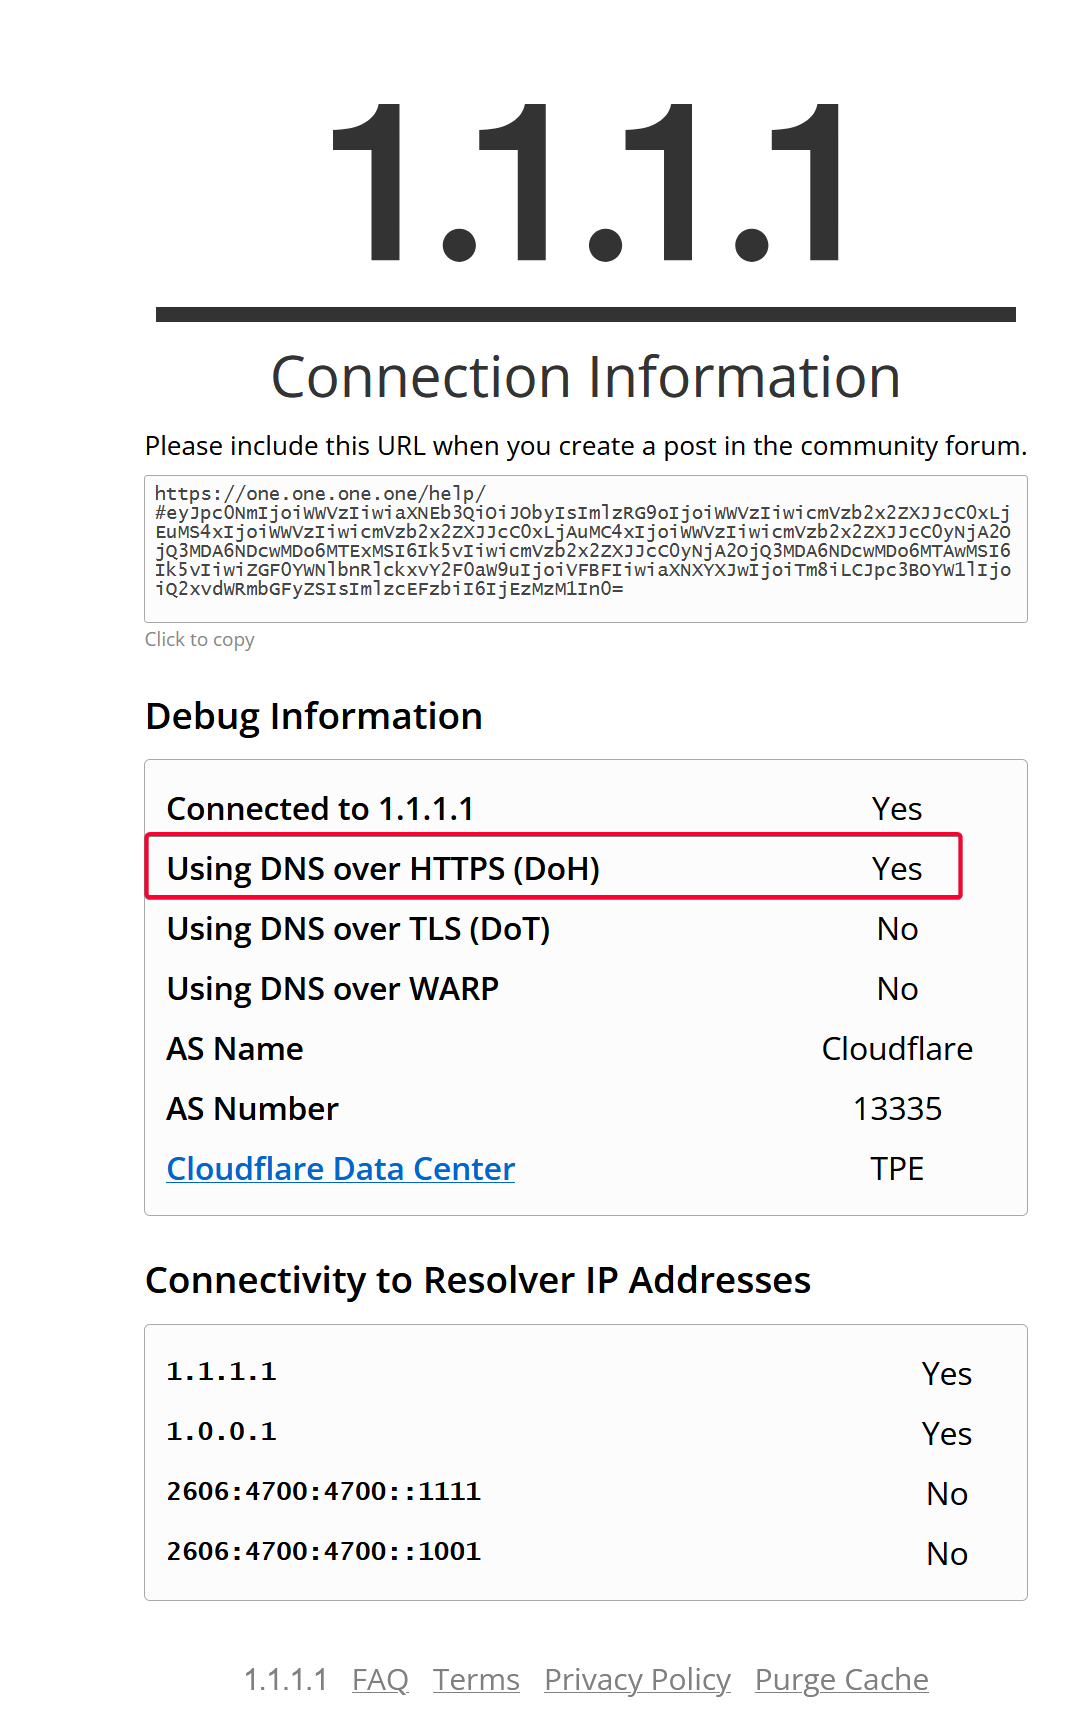
Verify that your PC DNS request is forwarded to Technitium, which then forward it to Cloudflare DoH DNS servers.
From your browser, visit https://one.one.one.one/help/. You should see a Yes value in Using DNS over HTTPS (DoH) row.
Also check the Logs from Technitium container to see your client IP, this is to make sure the DNS request is intercepted.
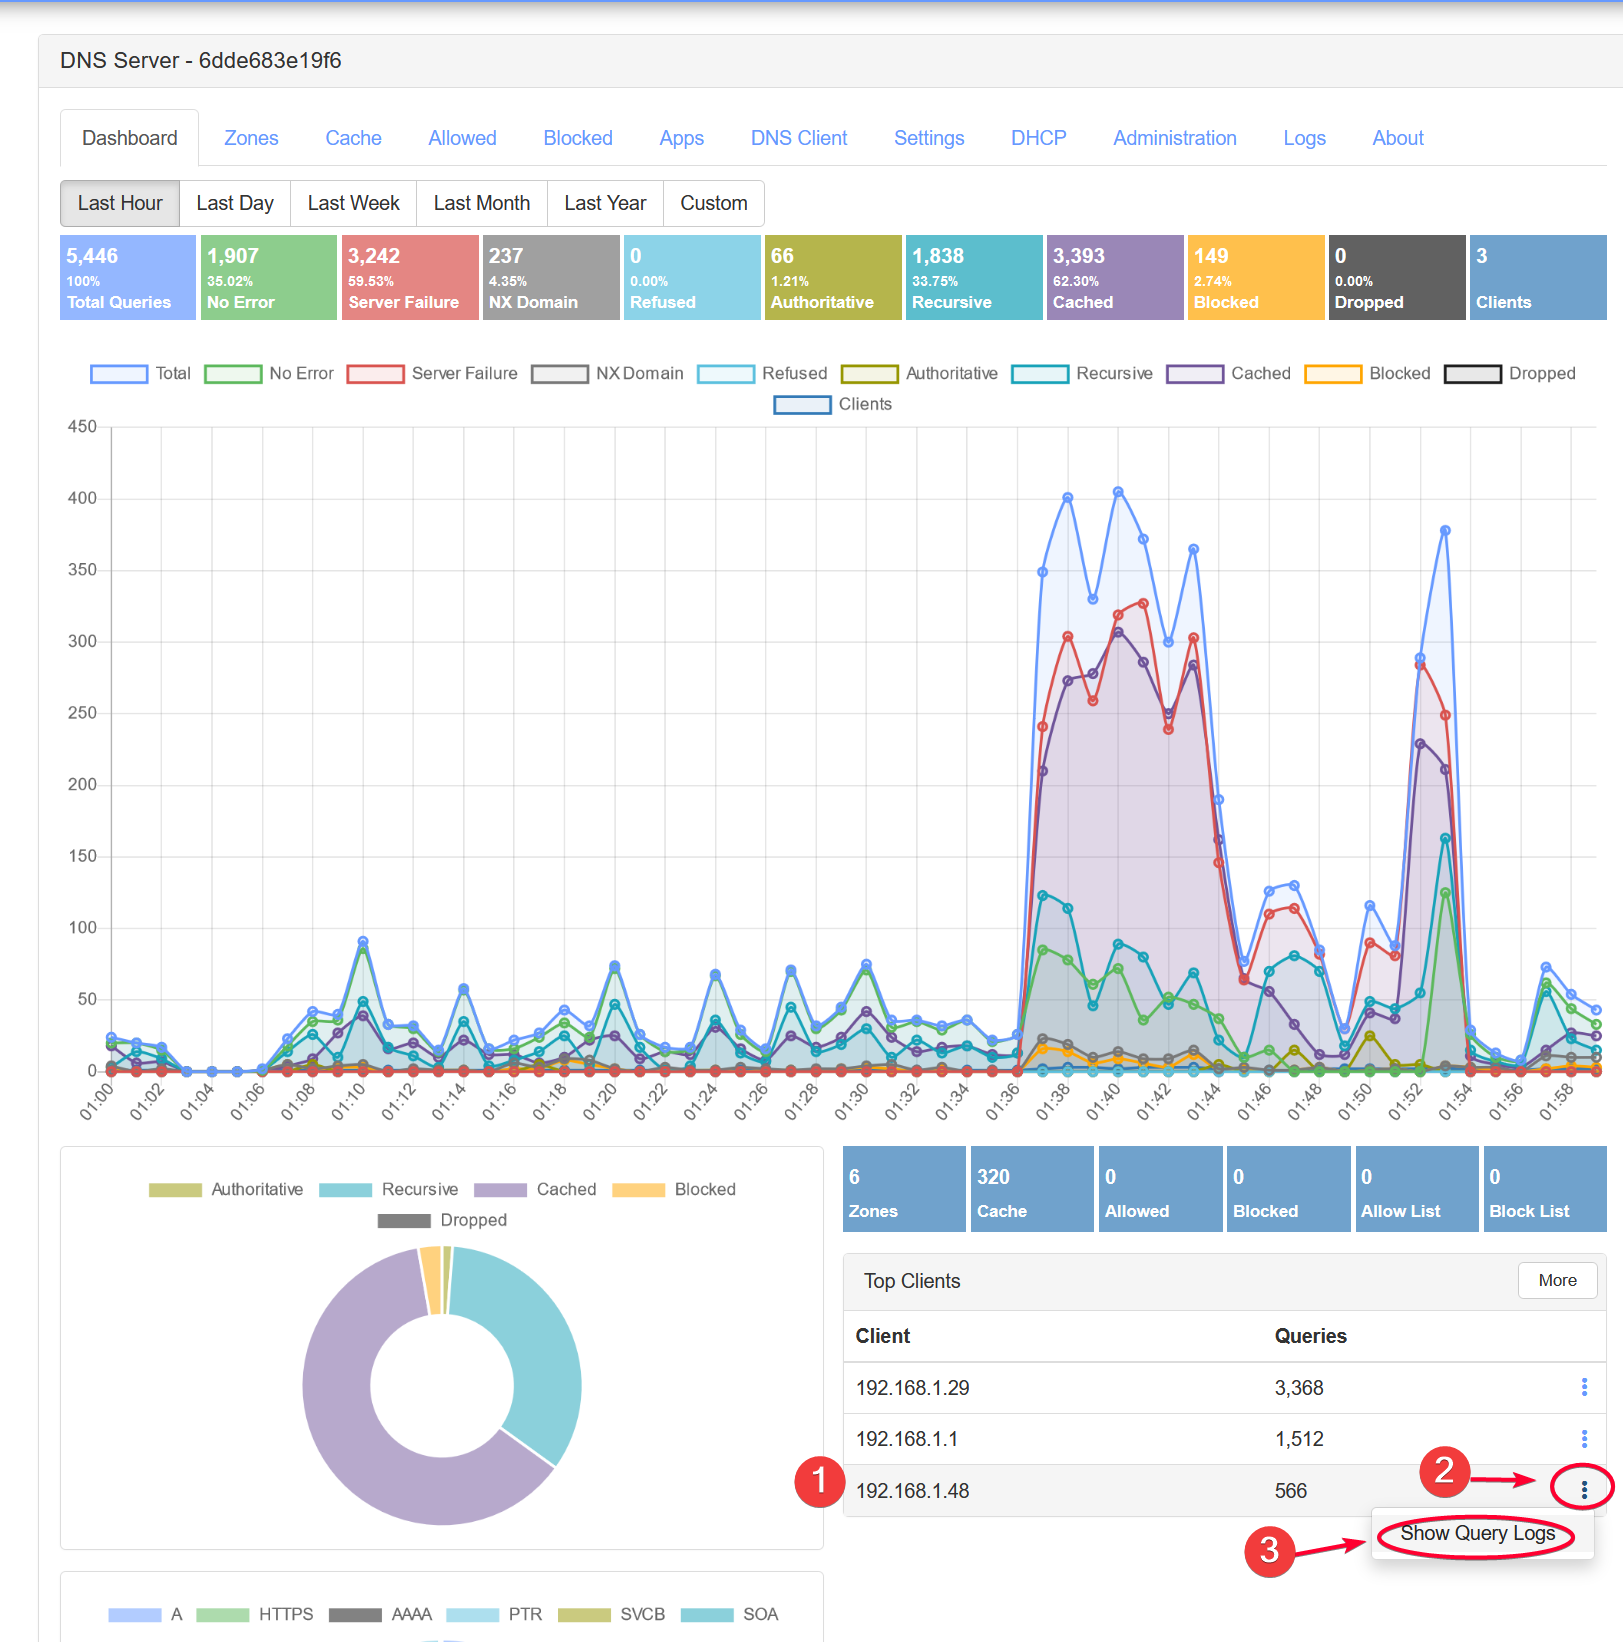
Before the logs can be queried, you have to first install Query Logs (Sqlite) from the App Store.

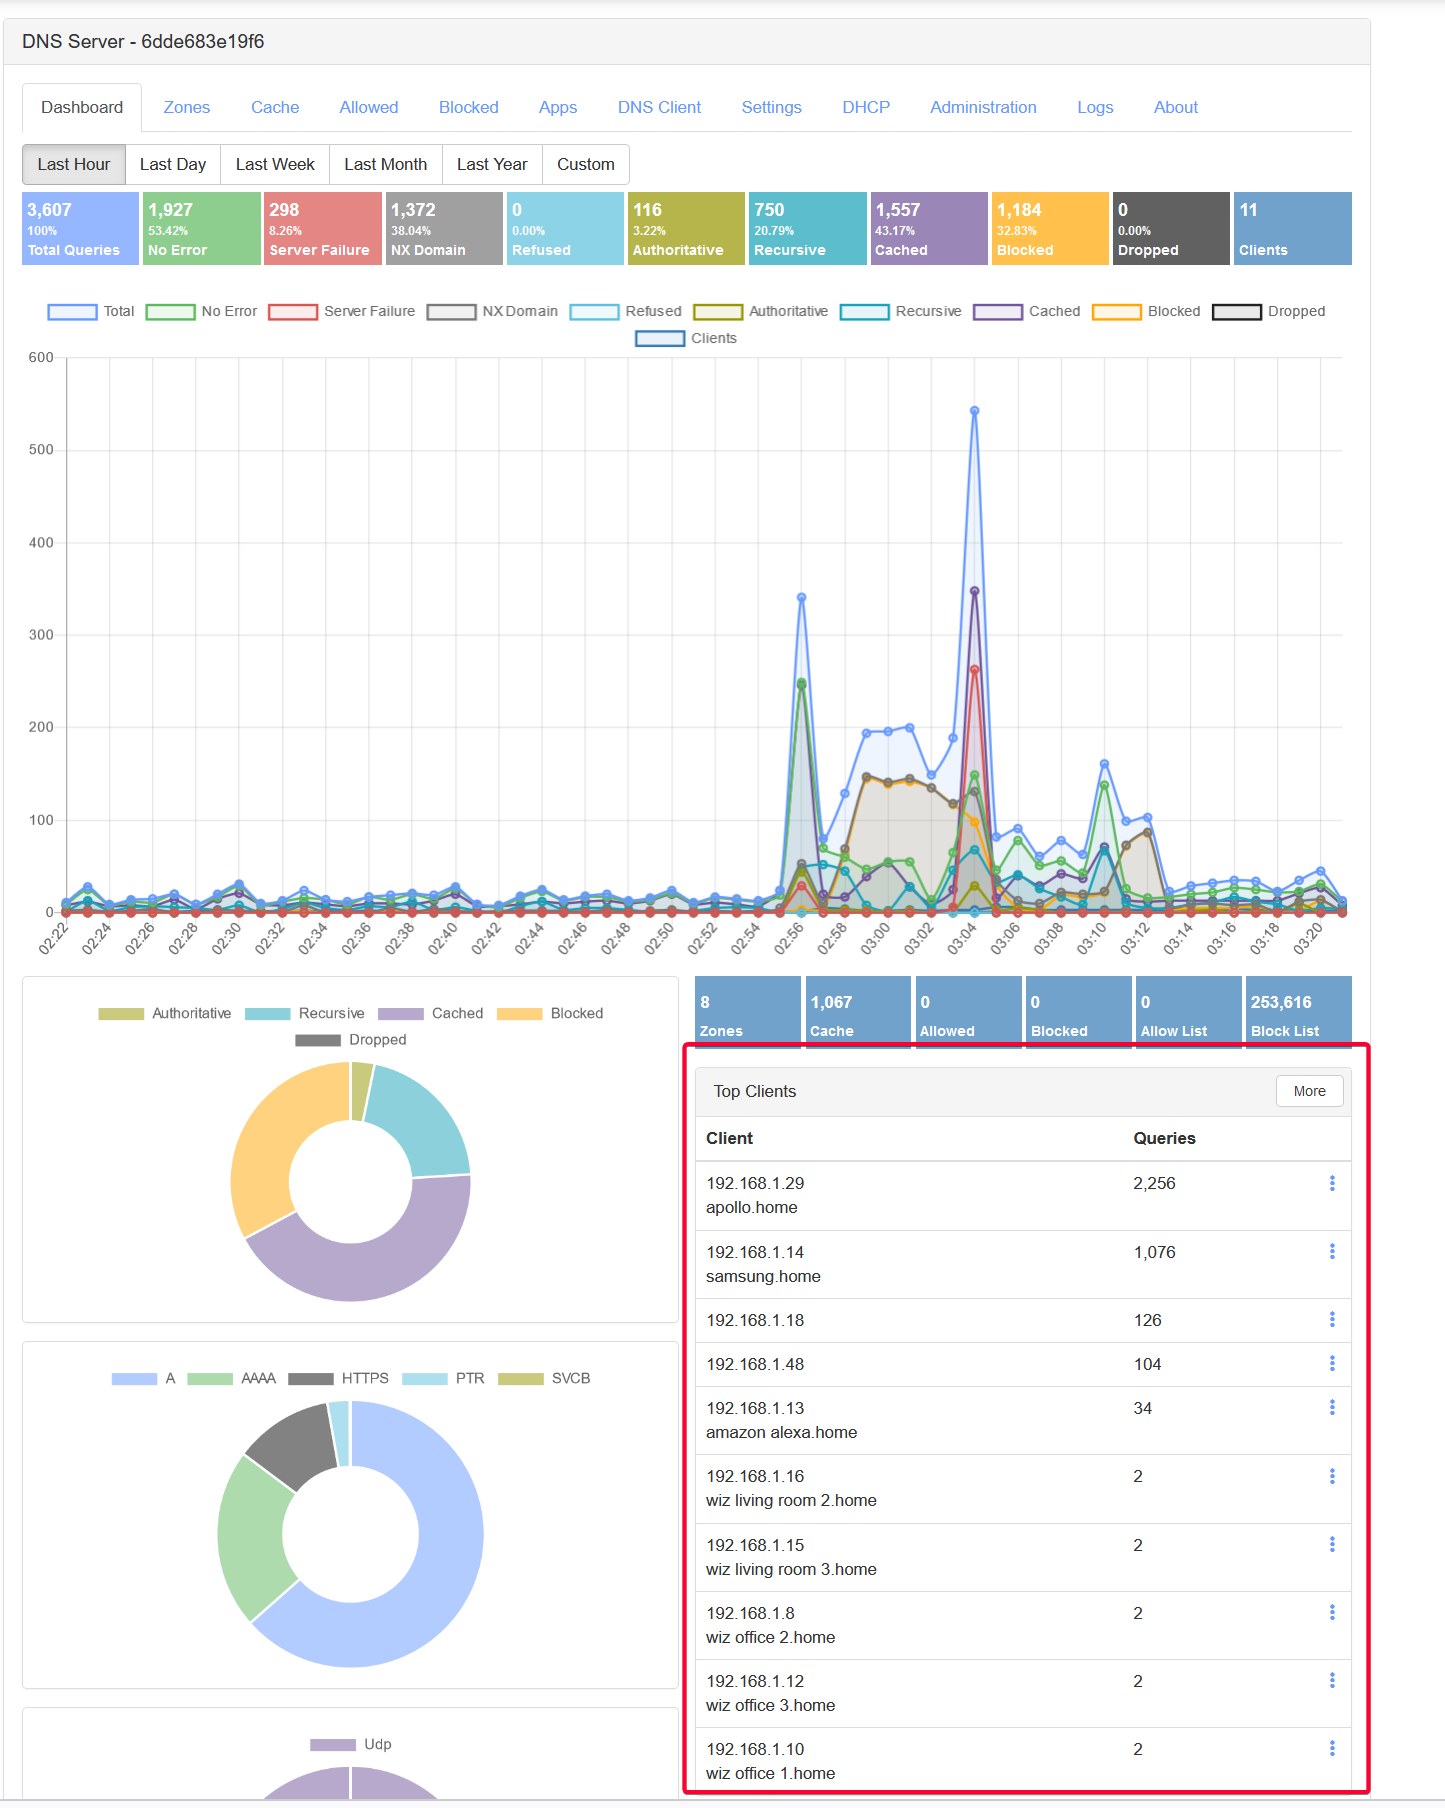
After that, click Dashboard , find your device IP in the Top Clients section, then click the ... > Show Query Logs button.
For example, my iPhone IP address leased from DHCP server is 192.168.1.48
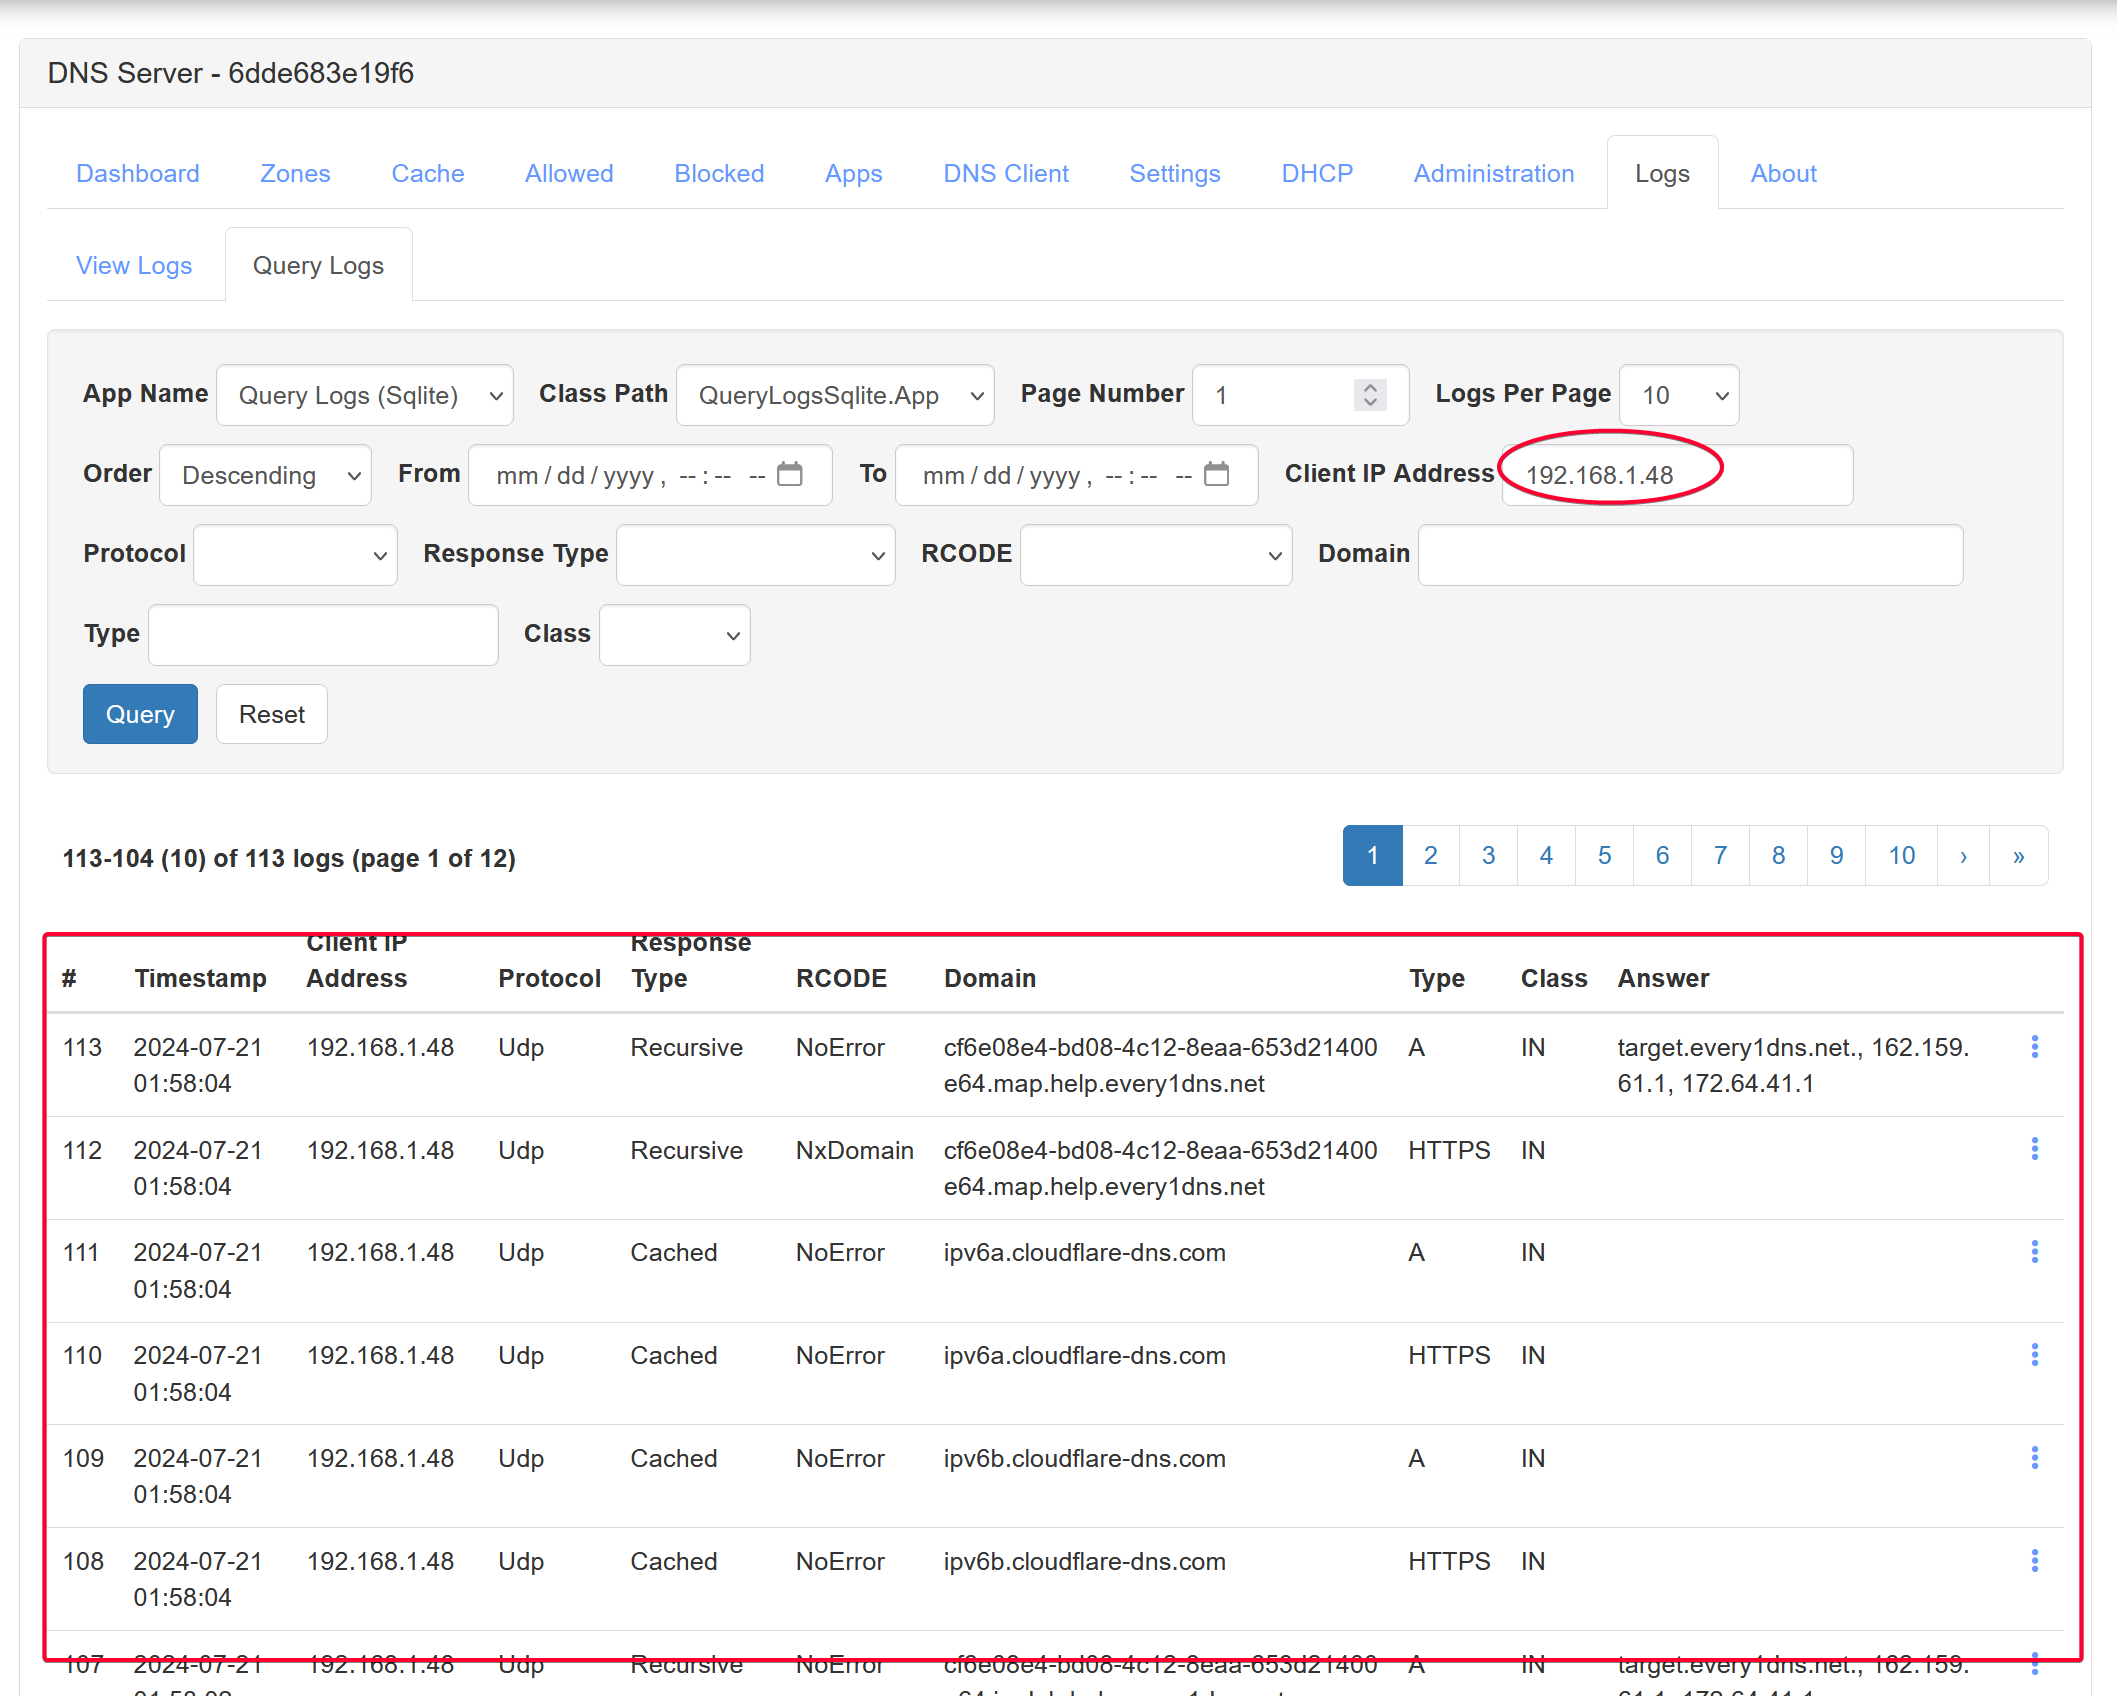
Clicking that IP address will show a query logs form, with the client IP address automatically filled in the Client IP Address fields. So all you need to do is click the Query button.
Add Block List for Sites
There are two ways to do it
Method 1: Via Settings
Go to Settings > Blocking, then click the Quick Add drop down menu to see a list of preconfigured block lists.
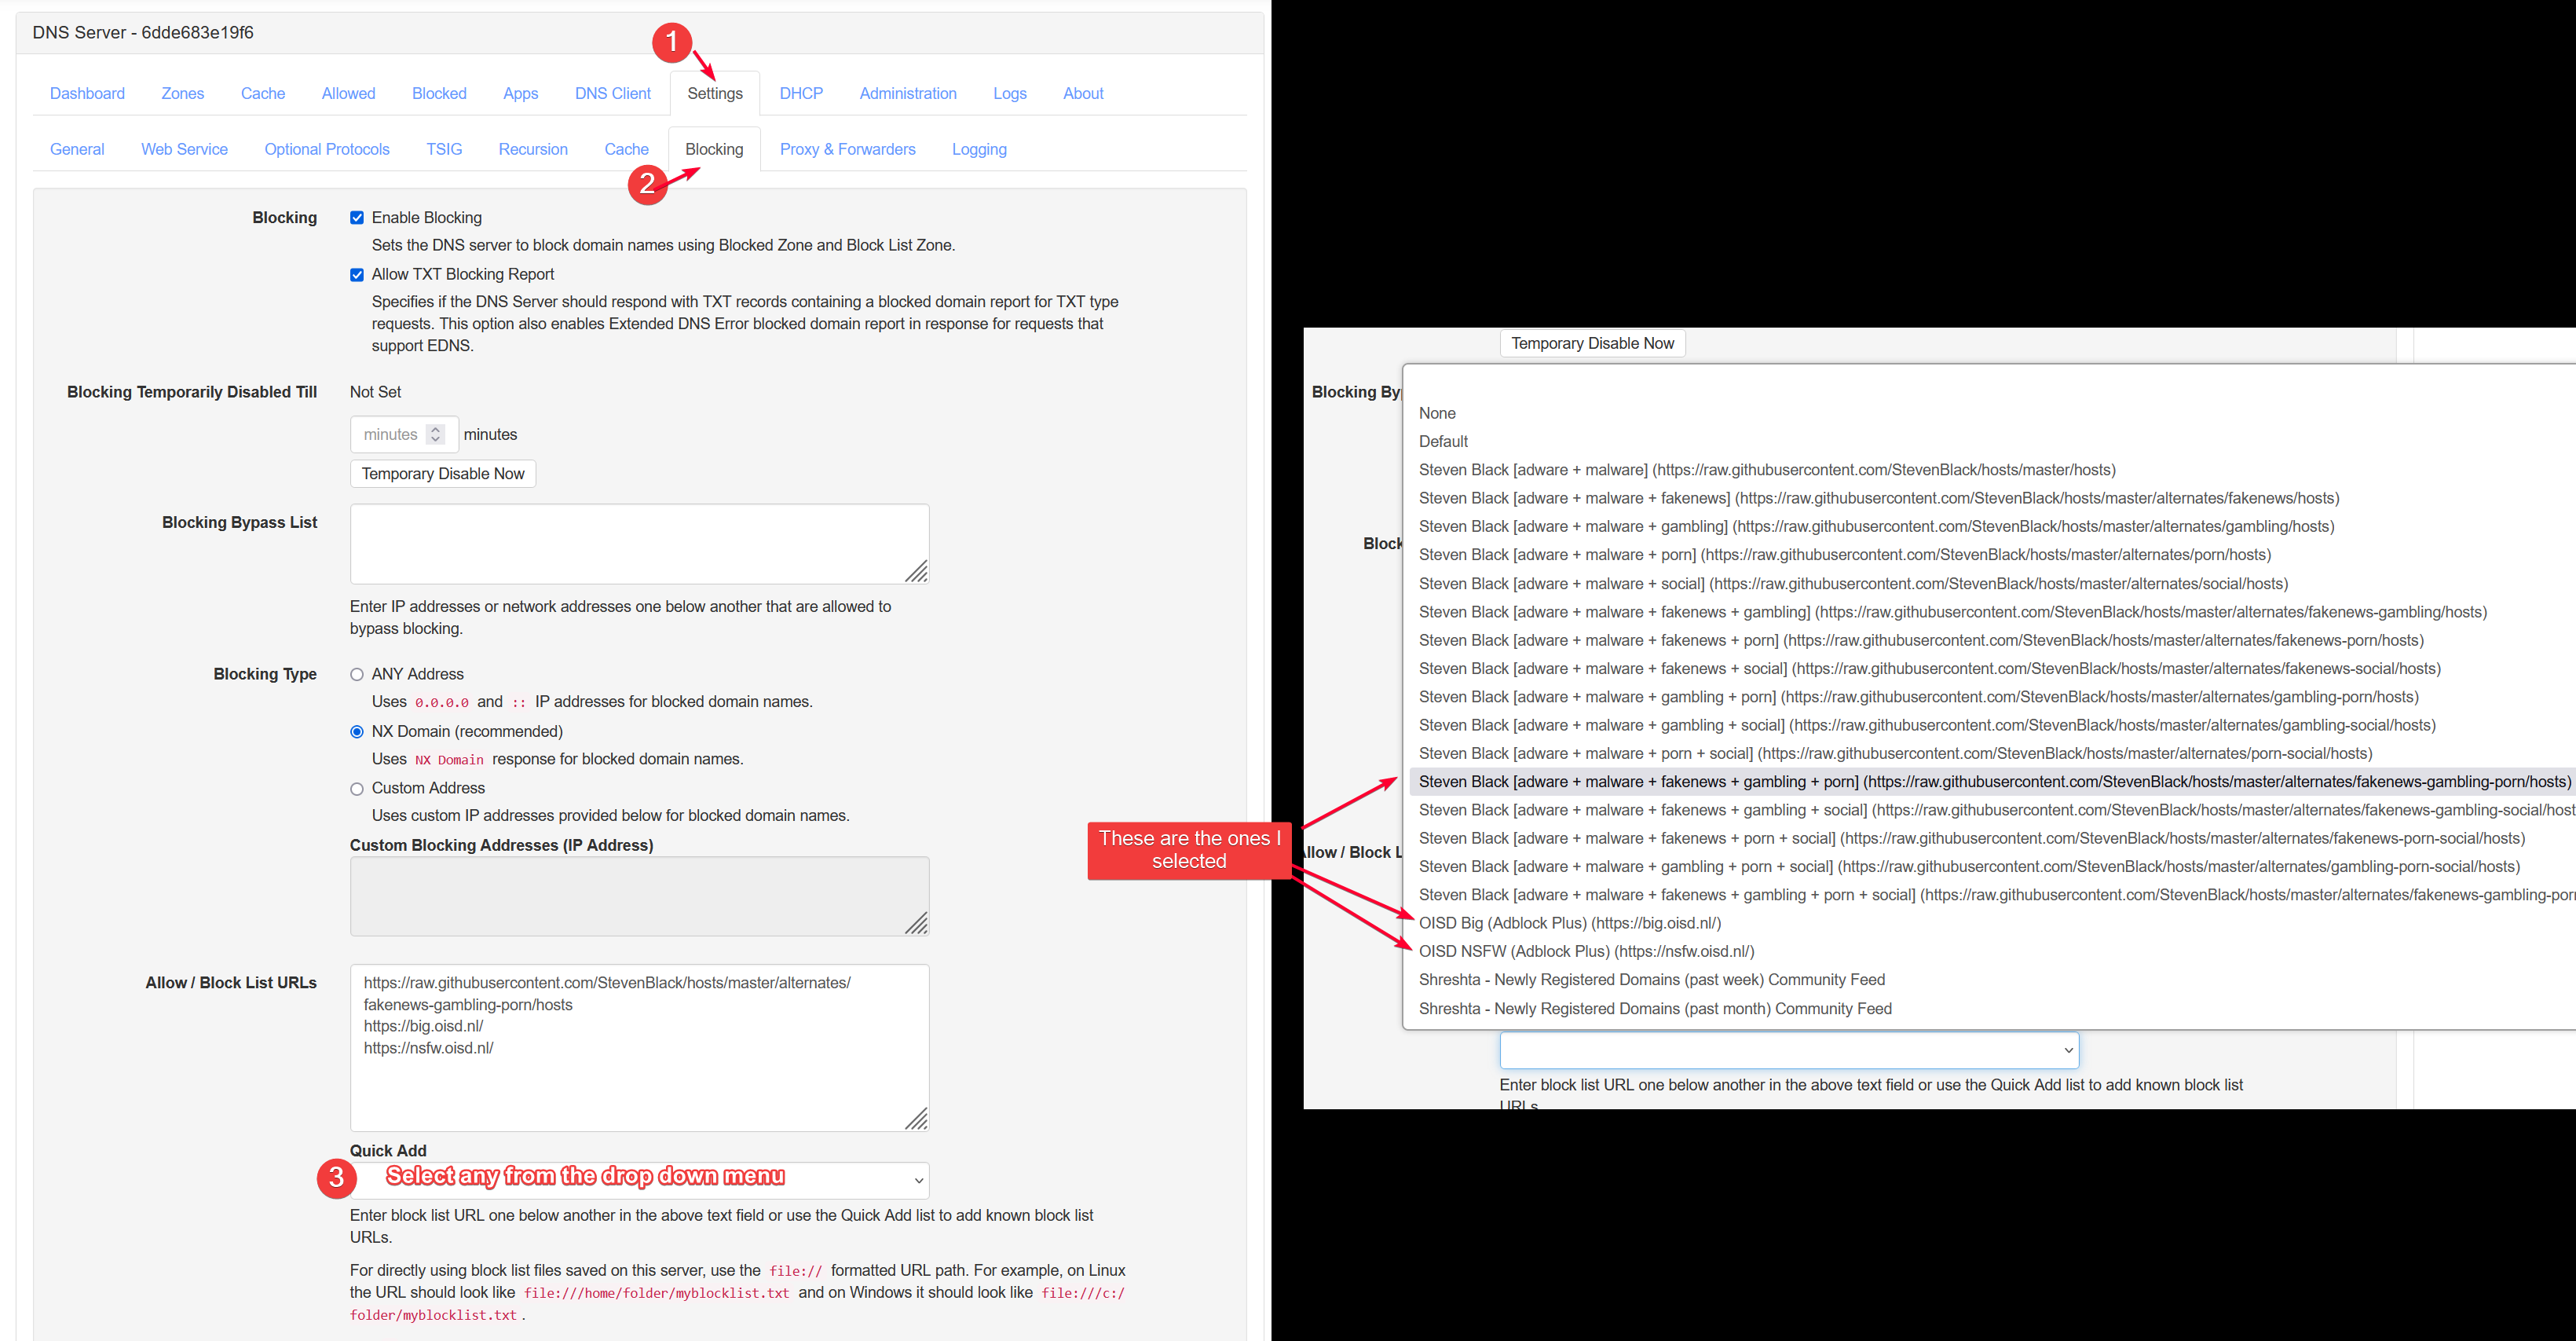
Click Save Settings on the bottom left when done. Wait a while and the sites listed in those list will be blocked. You won’t see any block page though, just the following generic error.
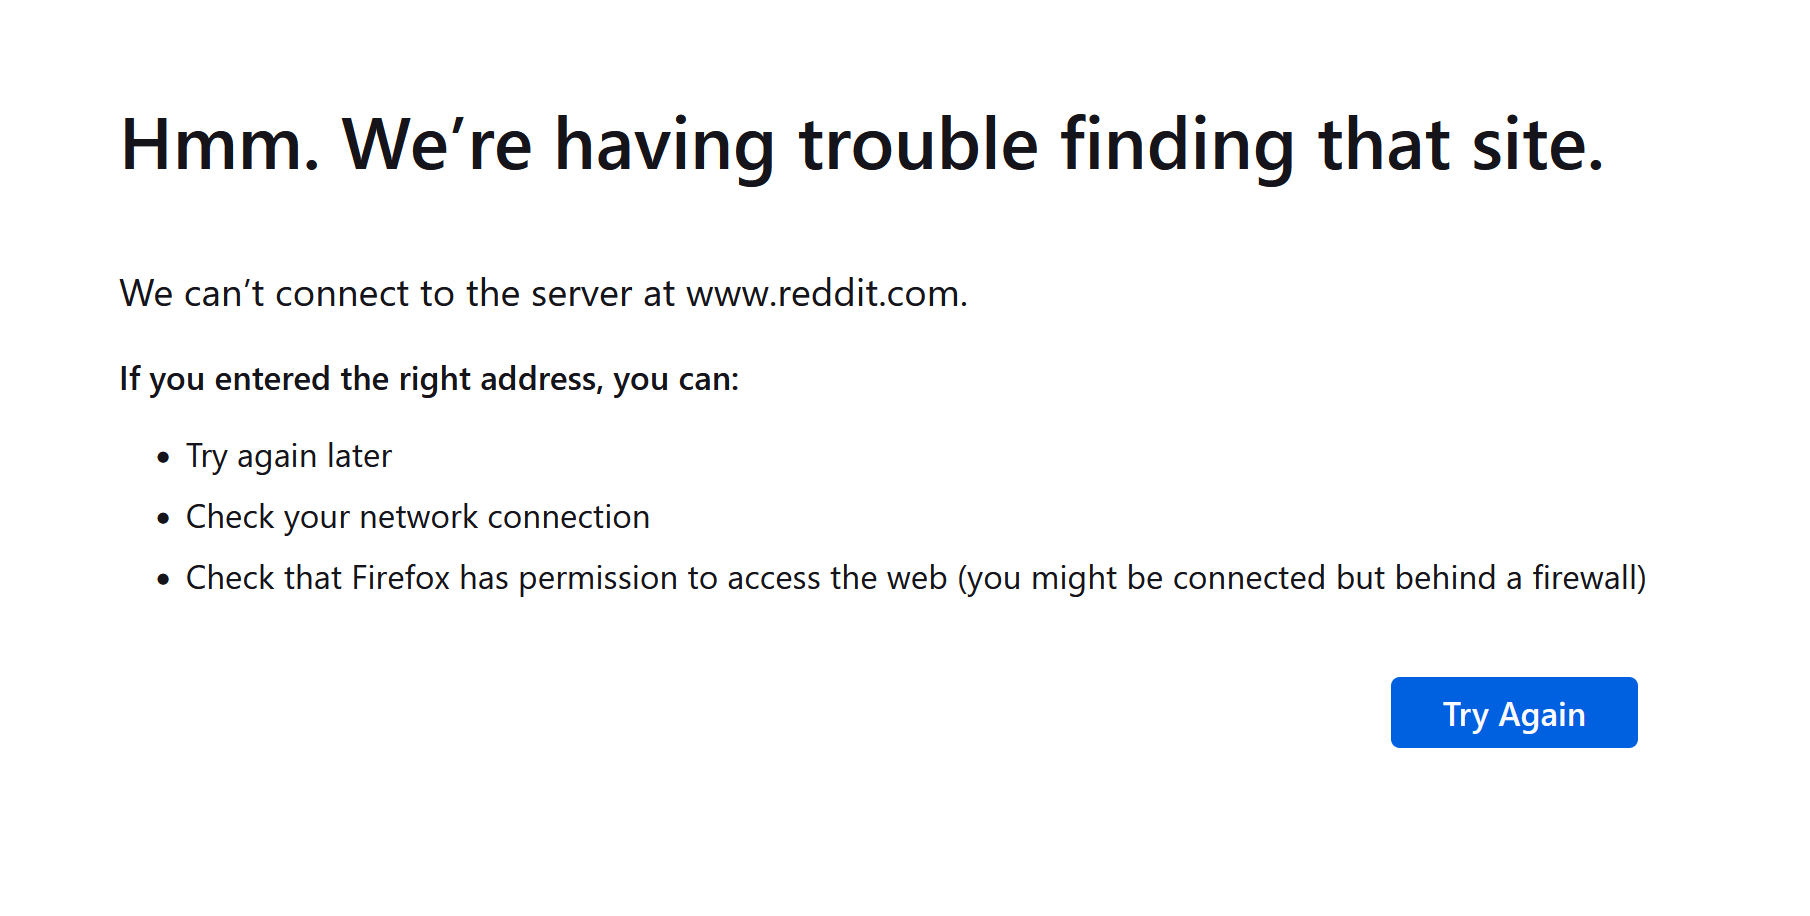
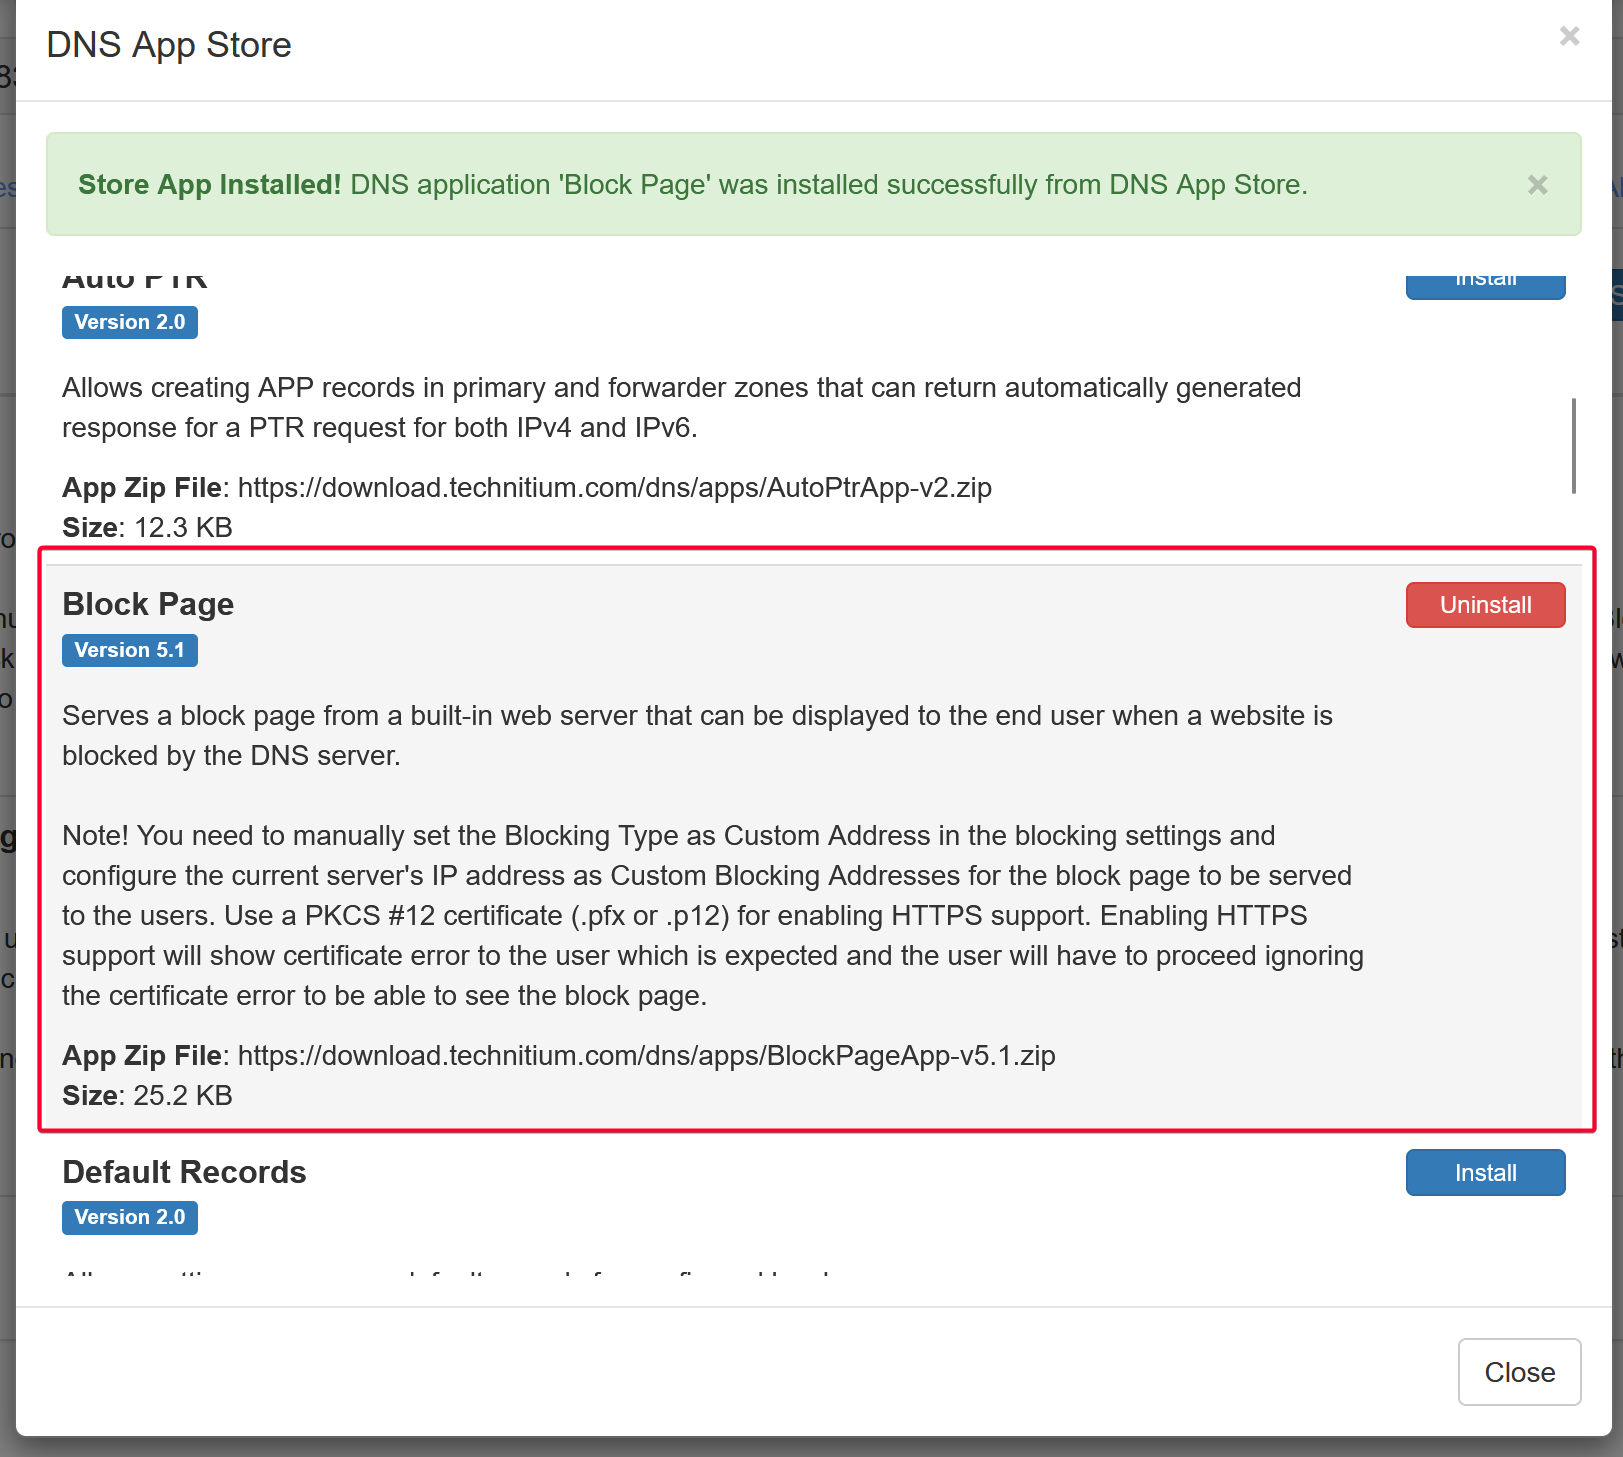
It is hard to tell if a site is blocked or is simply down. To solve this, you can download the Block Page app from the App Store that will show a block page if the domain is blocked.
TIP
💡 As of 2024-07-21, I am unsure how to get the block page to show with the default config. I will update it here if I managed to find a solution.
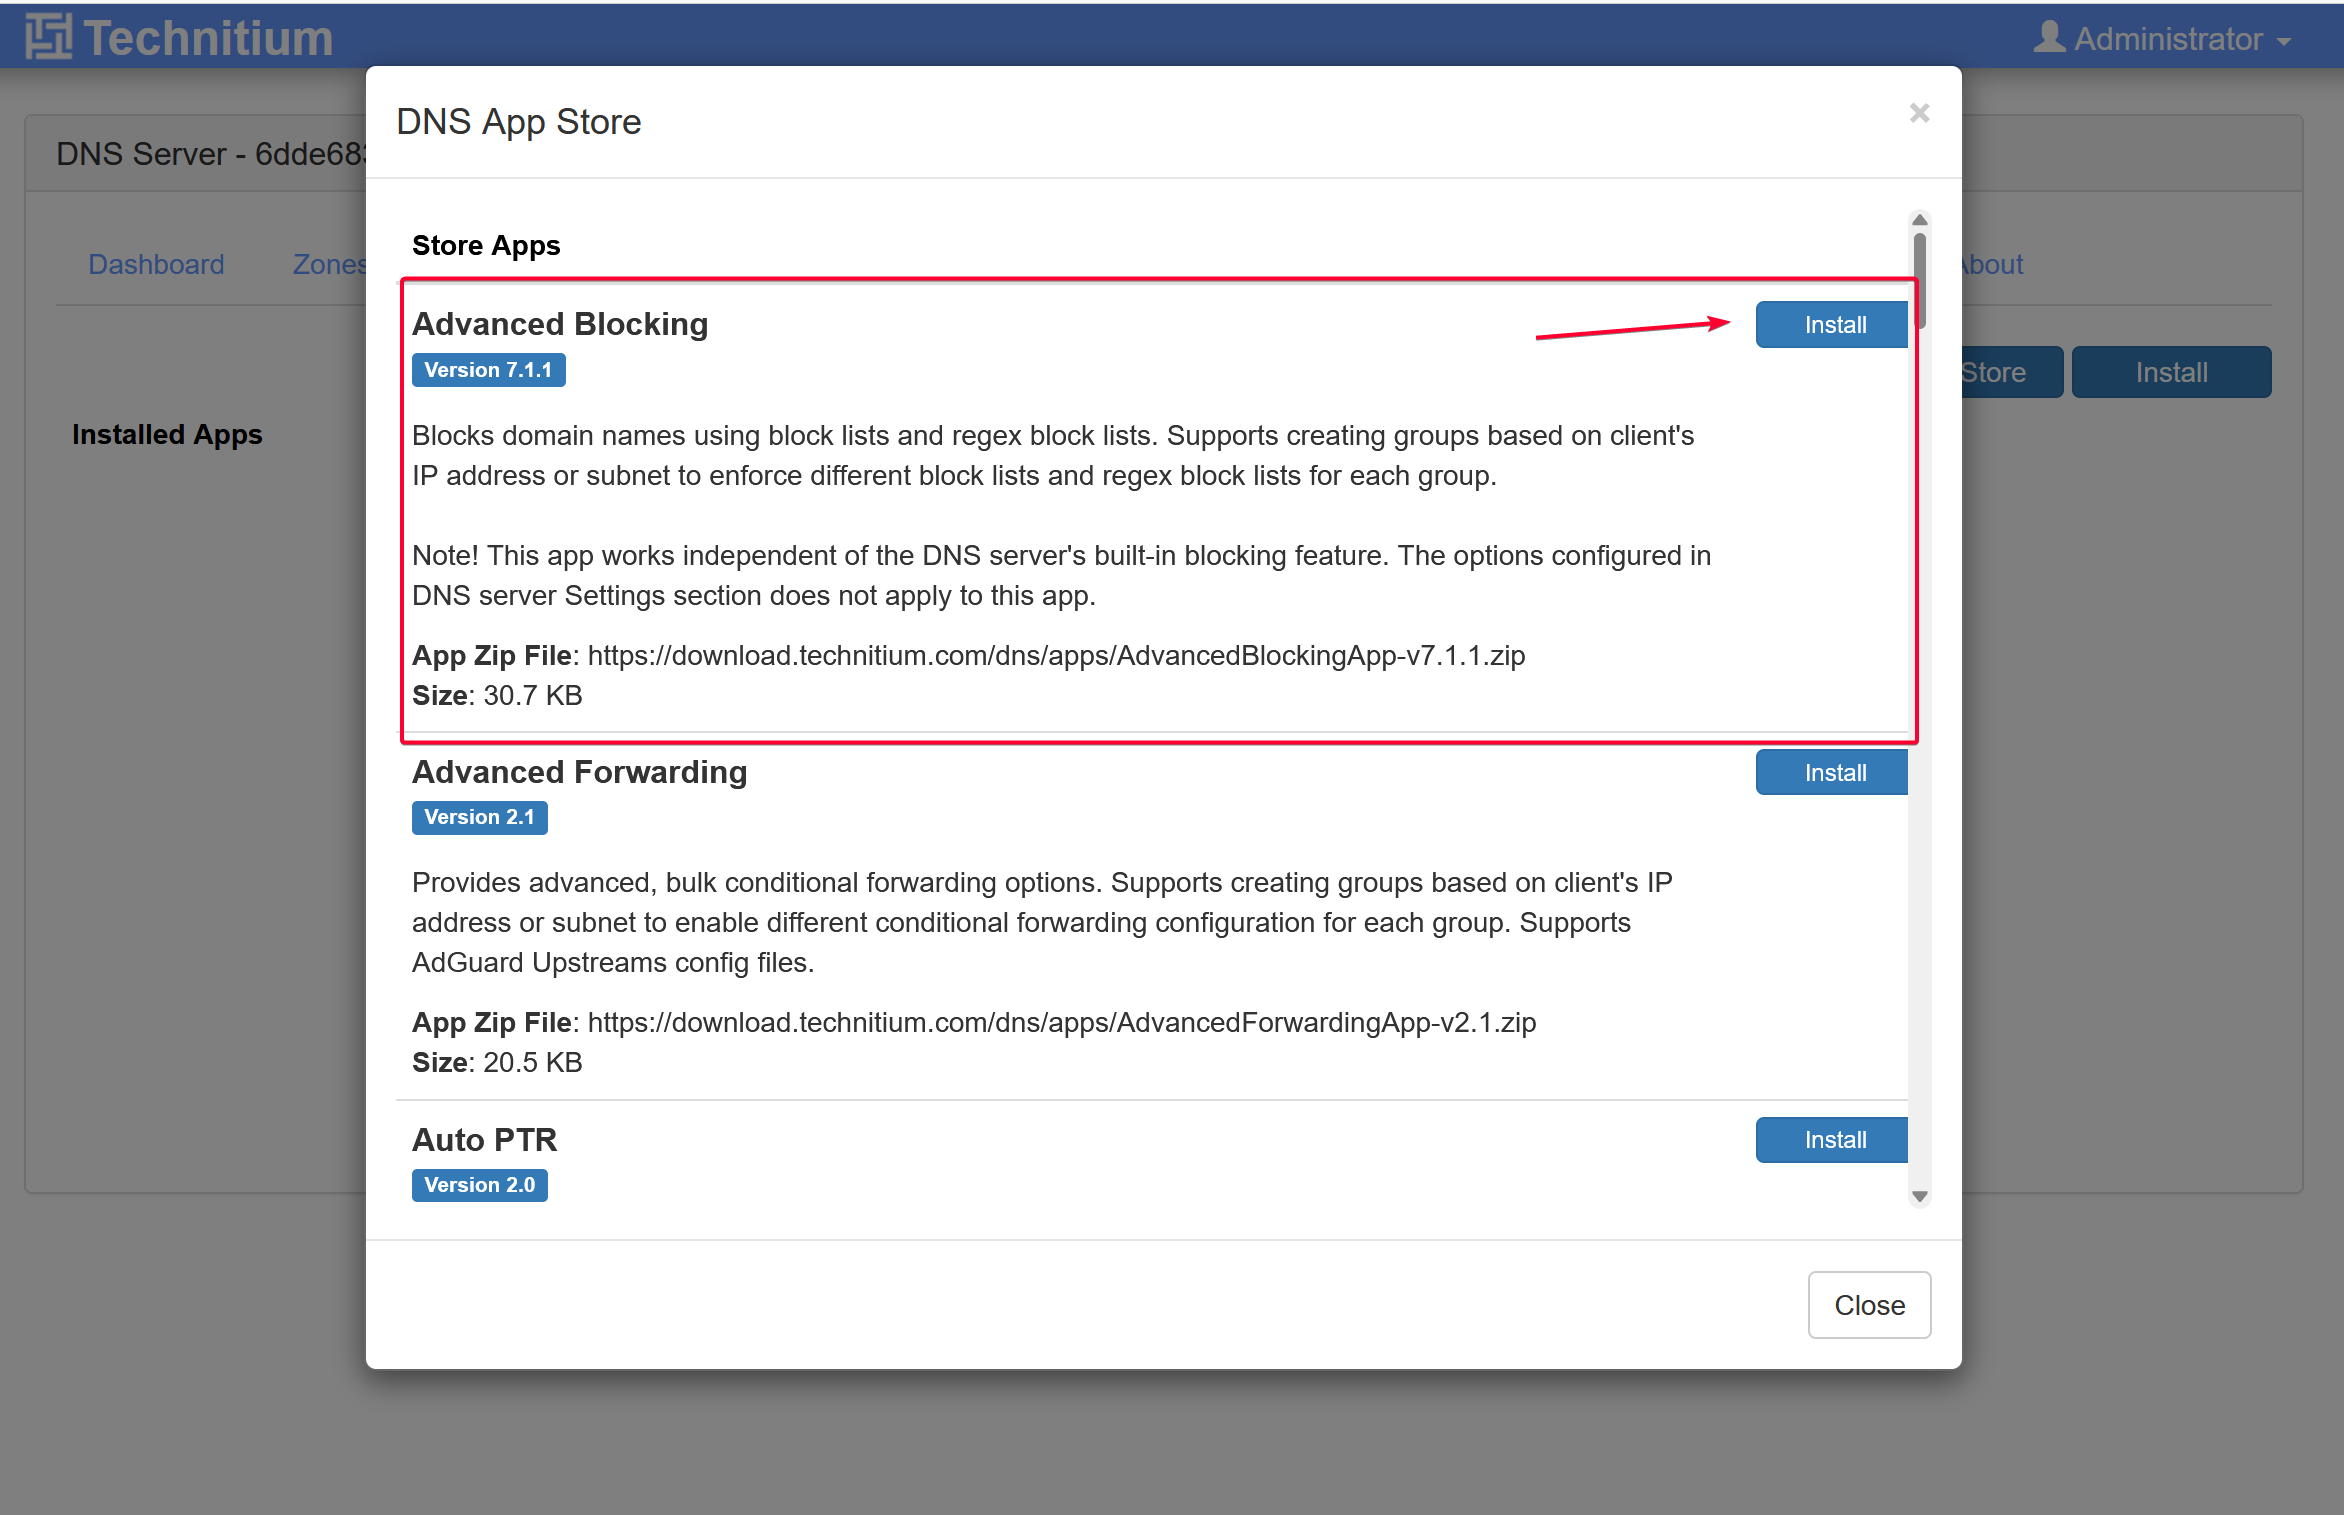
Method 2: Advanced Blocking App
Install Advanced Blocking app from App Store.
Click the Config button.
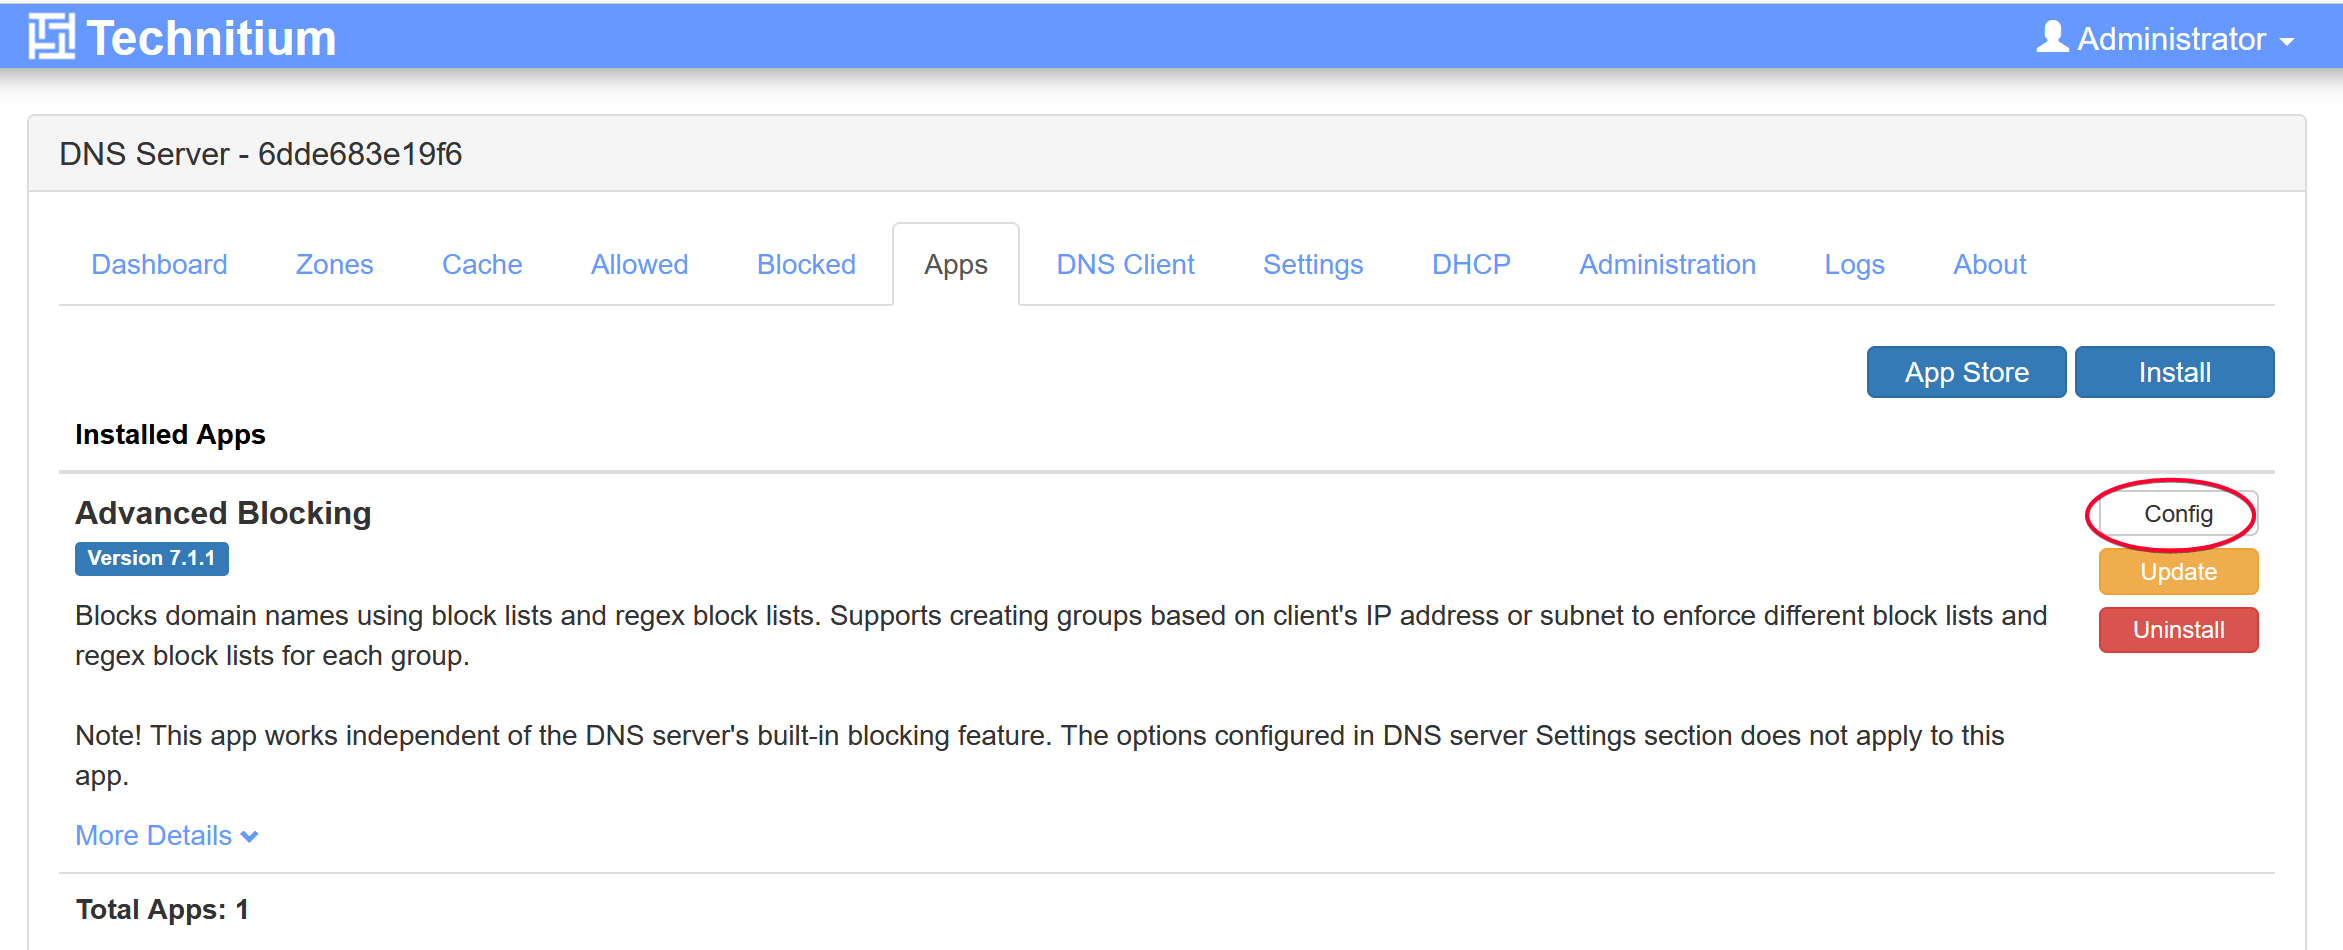
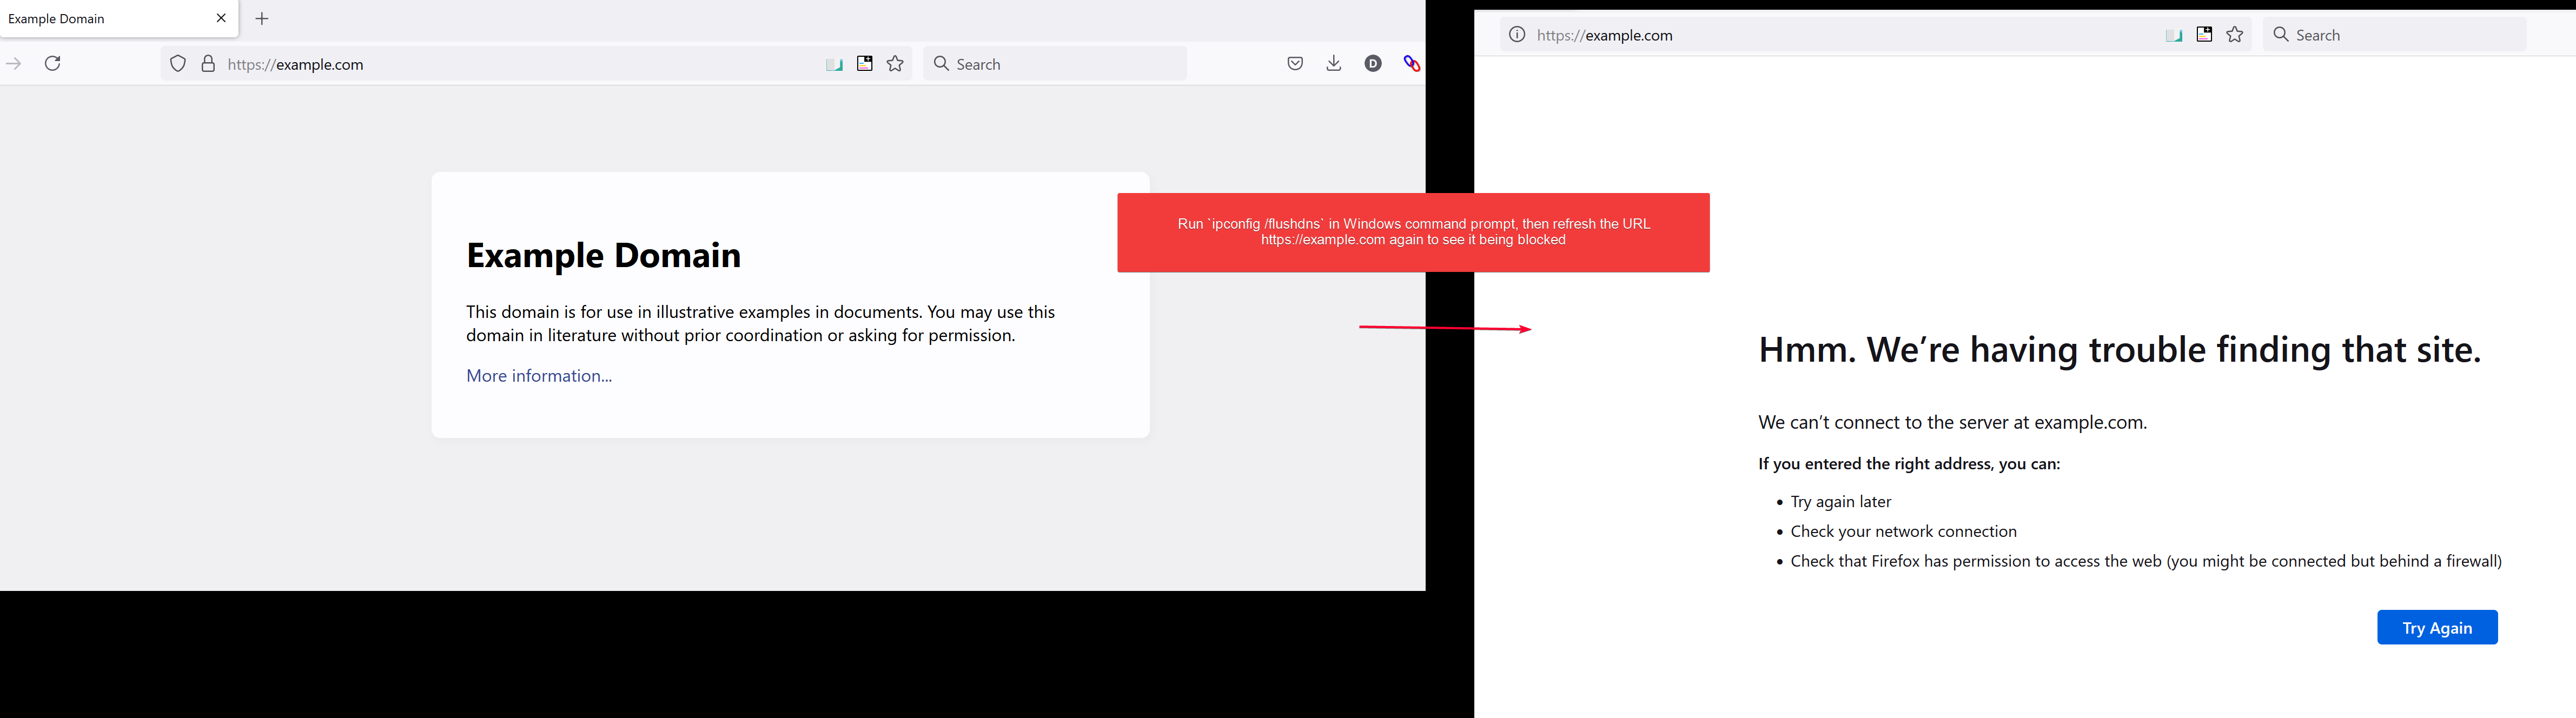
The app block example.com by default.
Before we test, flush your PC DNS to make sure it doesn’t use the cache query. Open command prompt then type the following.
ipconfig /flushdnsReload the page again and you should see it couldn’t resolve it.
Enabling DHCP Server
You can set Technitium device as the DHCP server in your subnet to lease out DHCP IP ranges to your devices. The DHCP server running in Technitium is configured to use its DNS server as the IP in the lease by default. By doing so, all devices that lease IP address from it will have the DNS server set to its IP address without having to manually set the DNS server.
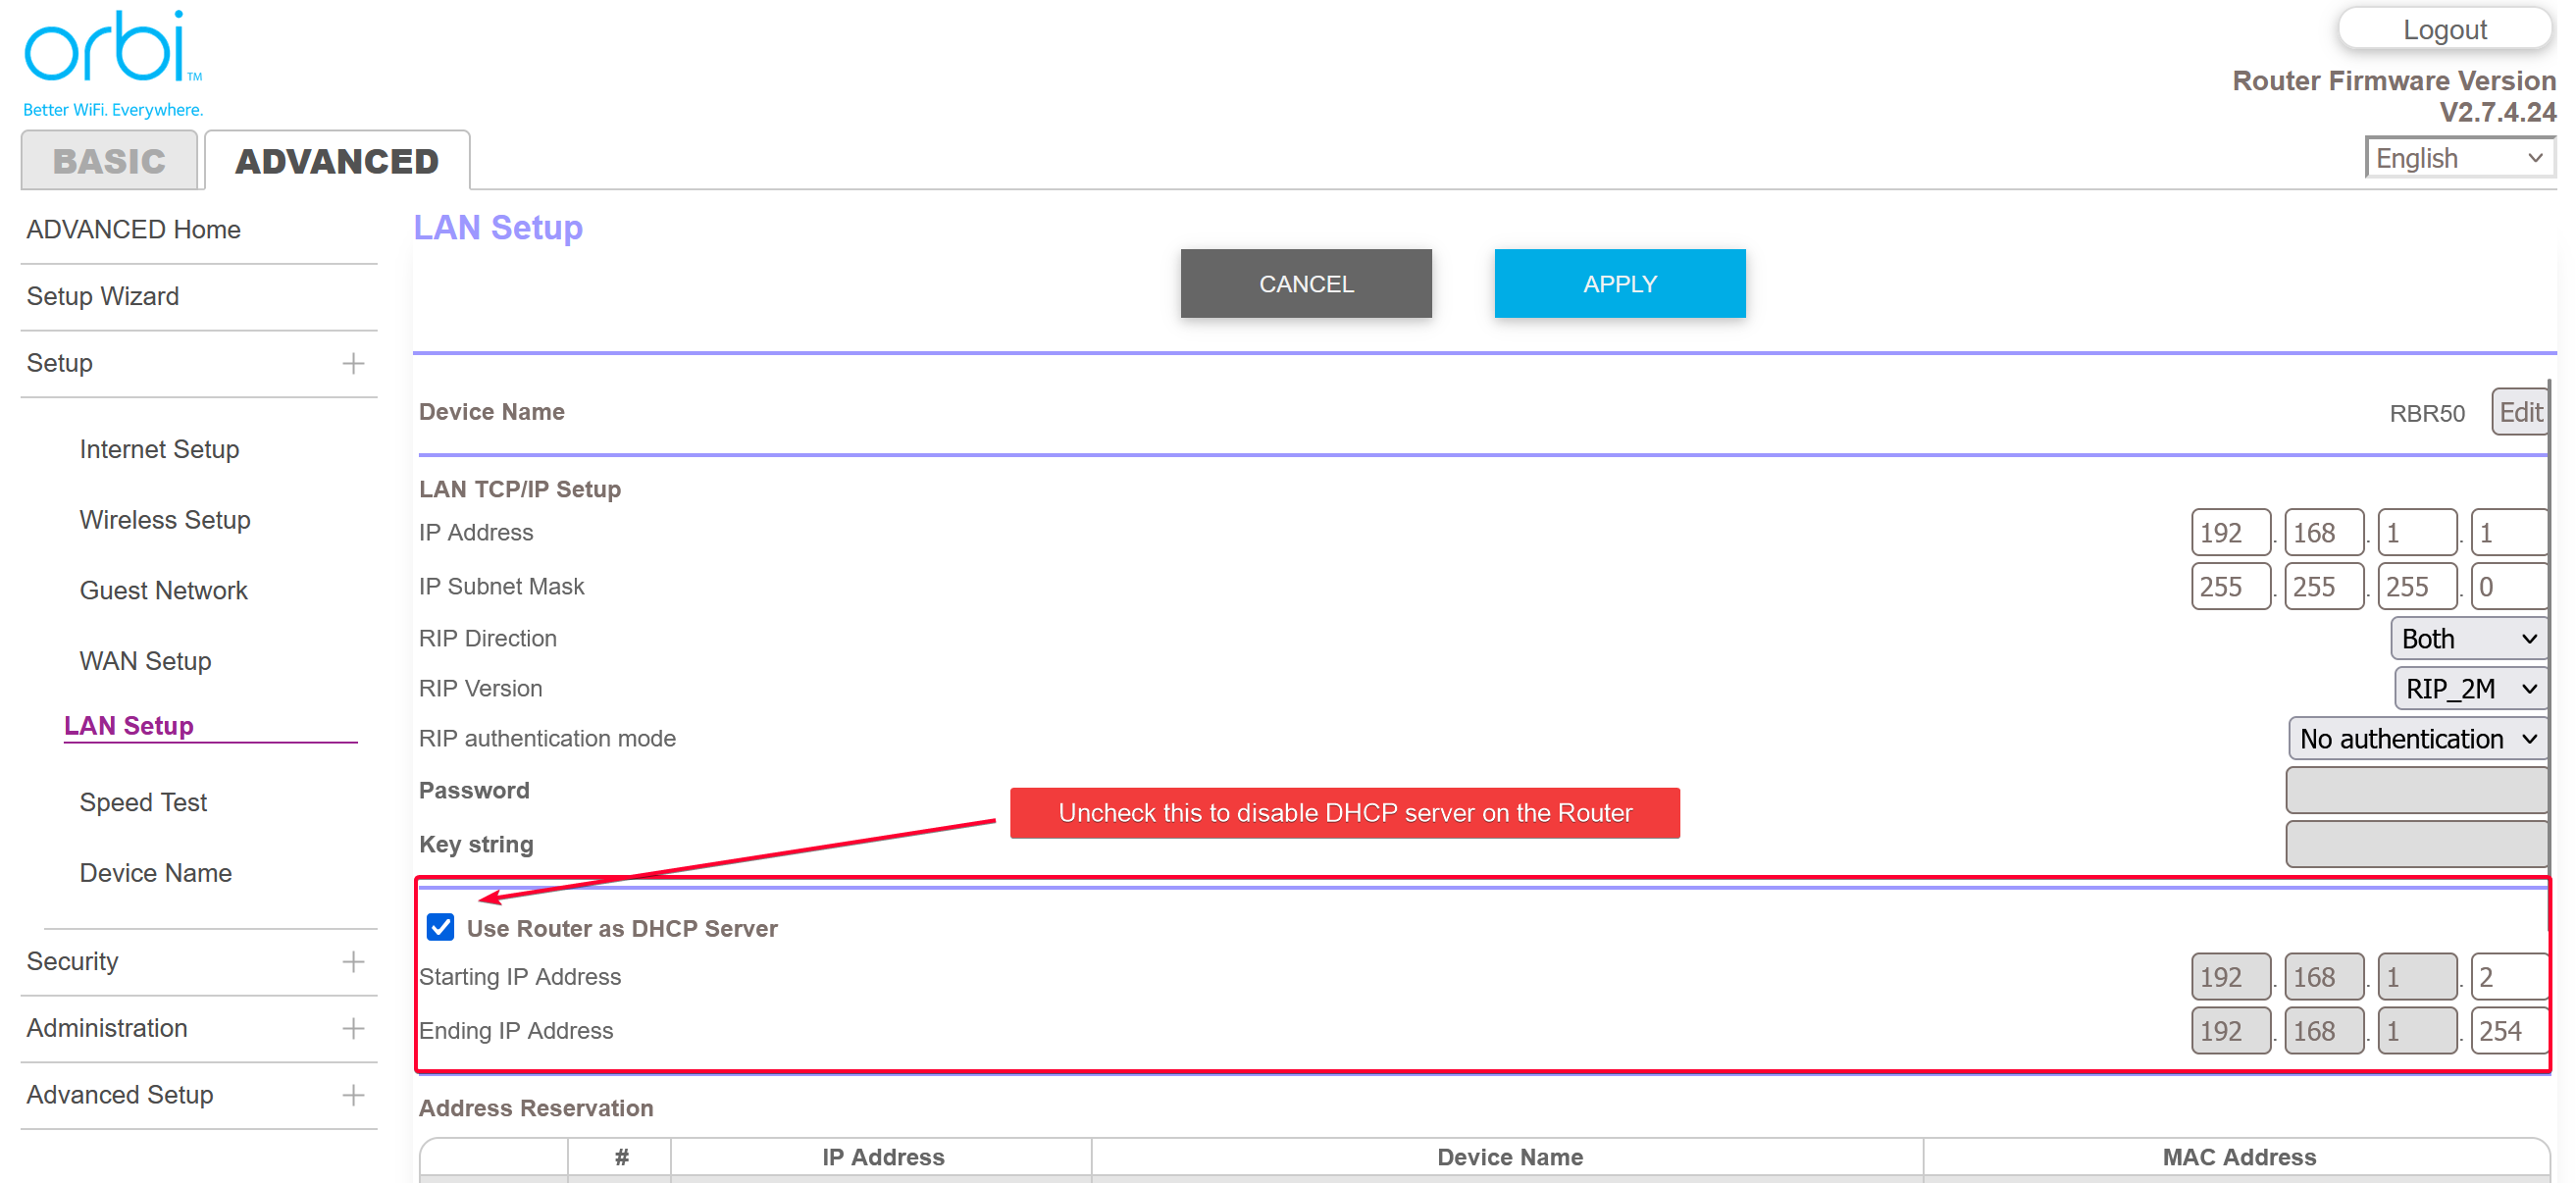
Disable DHCP Server on Router
To be safe, each subnet should only run ONE DHCP server to prevent IP conflict or mismanage. So we will have to disable the DHCP server running in most, if not all home router.
Note
💡 Router configured as Router and not Bridge typically has DHCP server enabled.
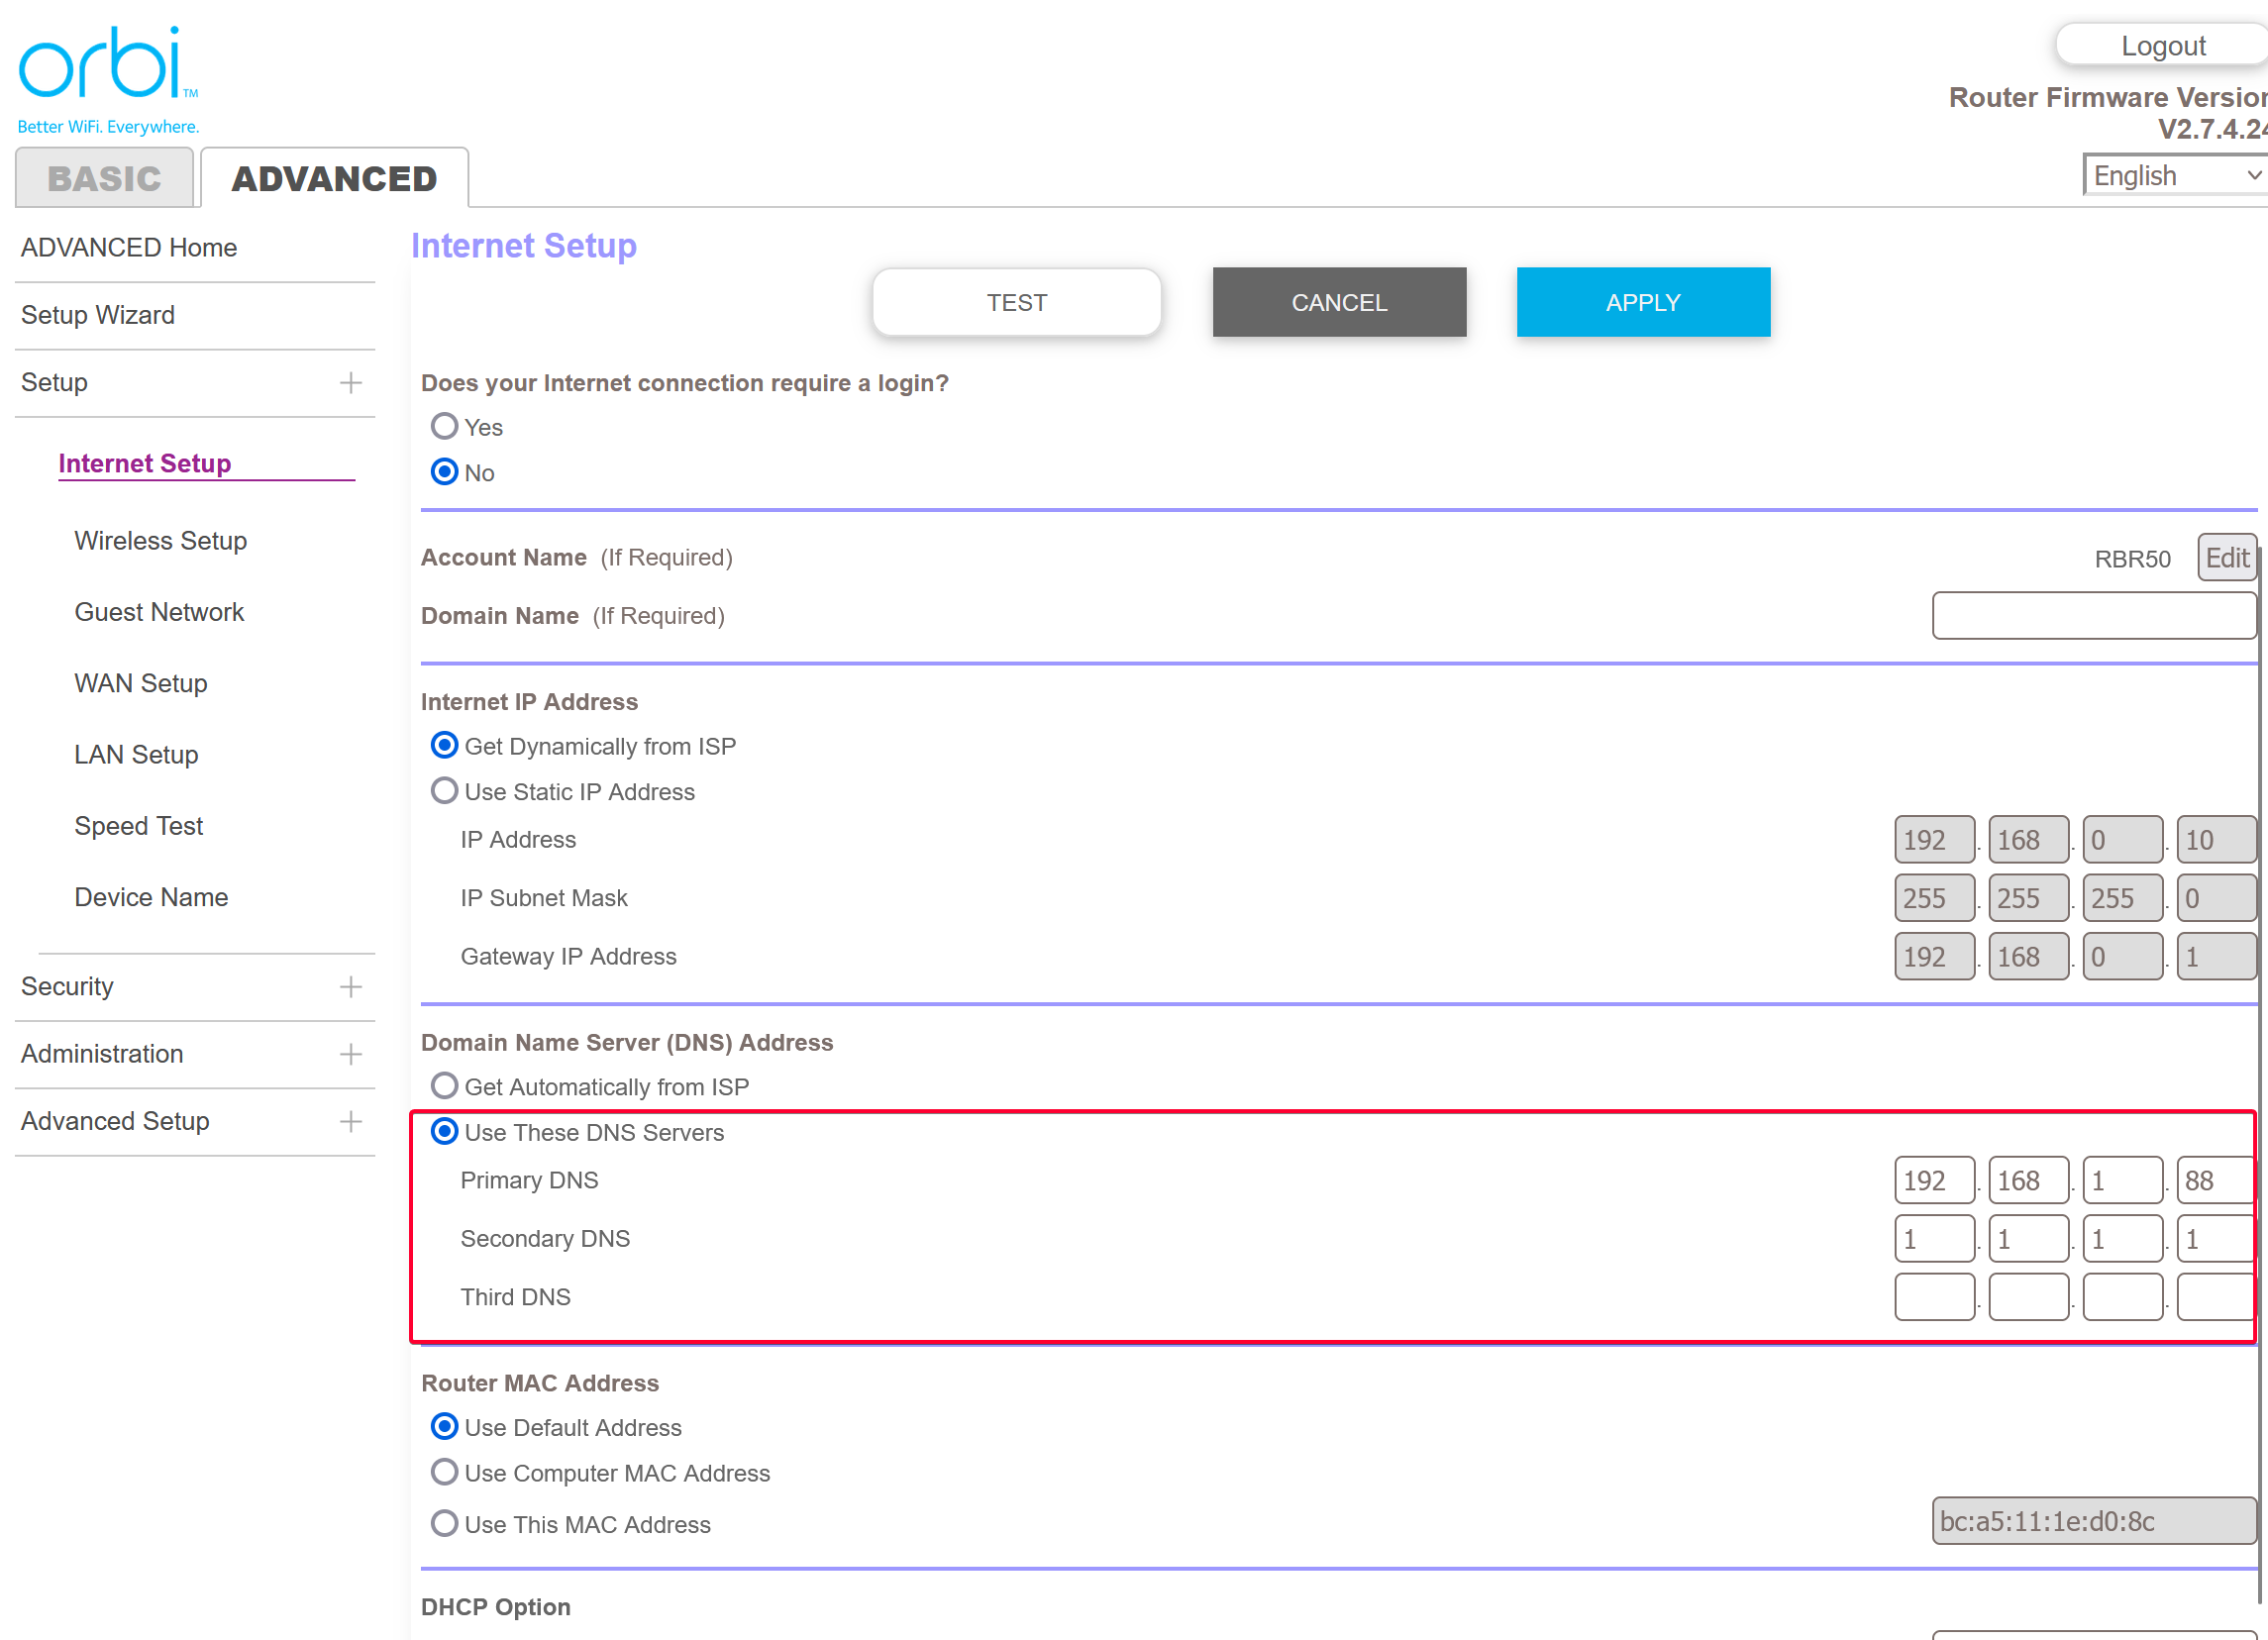
Login to your router settings, then modify your router DNS to use the Technitian PC as primary DNS, then 1.1.1.1 as secondary if the primary went down.
Following show the option to disable DHCP server on my Orbi RBR50.
In case you are wondering how can the DHCP packet reaches the DHCP server running on Technitium device if it is disable on the router. The answer is broadcast packet. Devices will send out a broadcast packet asking for DHCP server, so as long as your Technitium device is within the same subnet as the router, it will be fine.
Why use Technitium as DHCP server instead of the router DHCP server?
💡 Most DHCP server option running in the router has very limited option, most likely it is just IP range settings. Even if you router has the option to specify the DNS server to lease out, it is still better to use Technitium as the DNS server since it will log every query, and you can then inspect each one of them.
Personal Note
💡 For some unknown reason, after disabling the DHCP server on my router, I can only get certain devices to work. My iPhone for example refuses to get the IP address leased from Technitium DHCP server. So for the time being, I still enable it on the router, but use the same Address reservation list in both sides. Devices with Address reservation can get the IP address and the right DNS server IP just fine.
IP Address Reservation
To reserve IP address for your devices, make sure to scope it within the range.
For example, I’m using a scope of 192.168.1.2 - 192.168.1.100
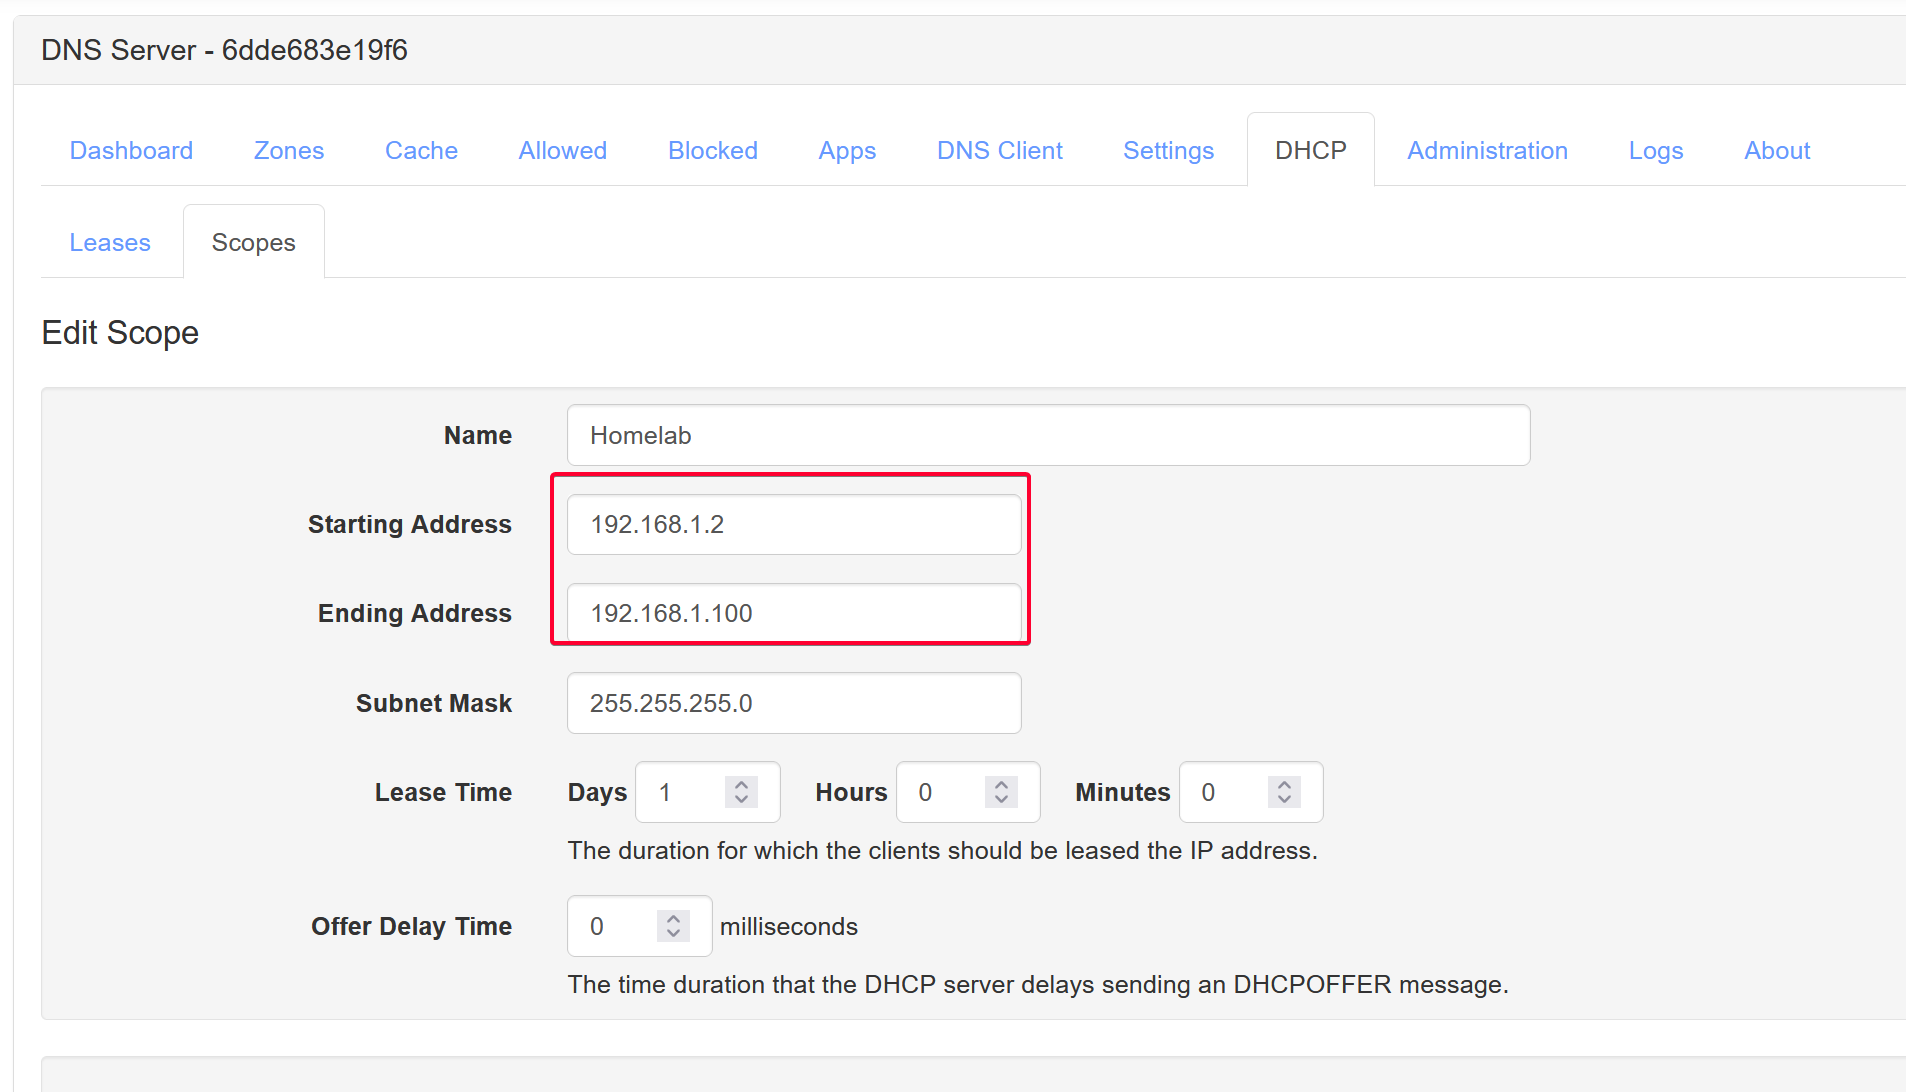
Create an exclusion range which MUST fall within the scope defined above.
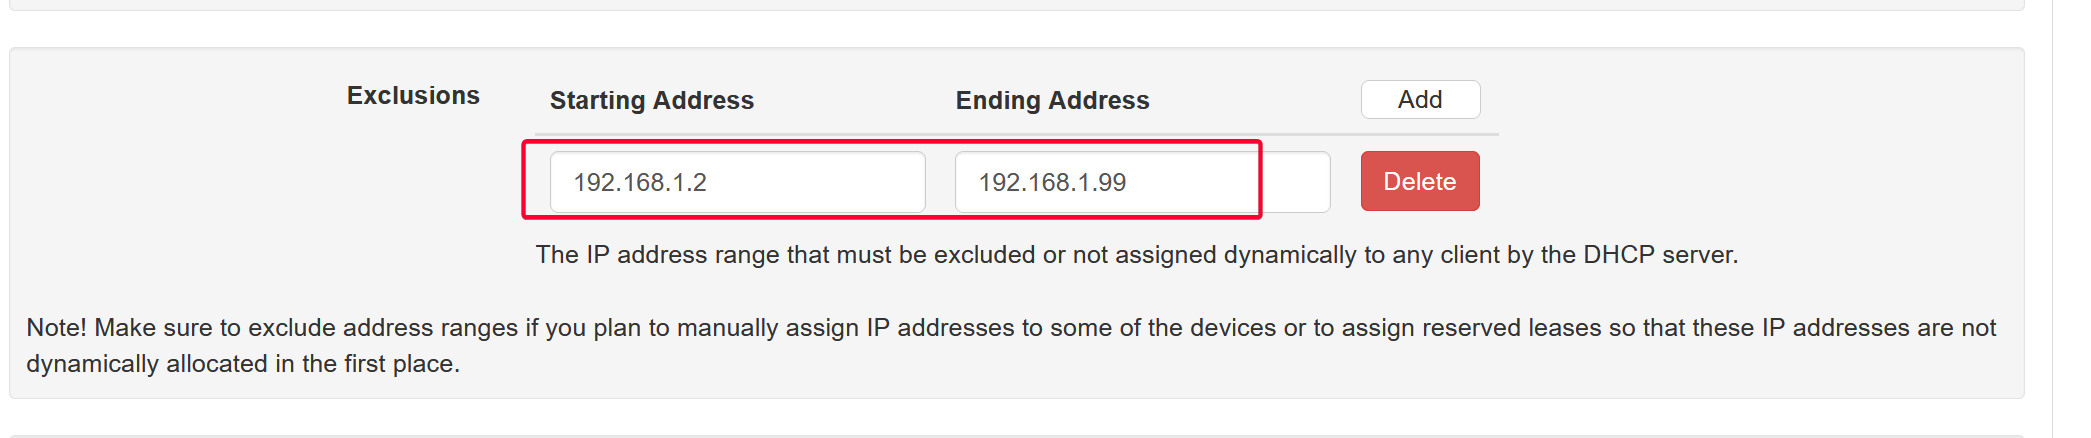
You can then use those excluded IP range in the Reserved Leases.
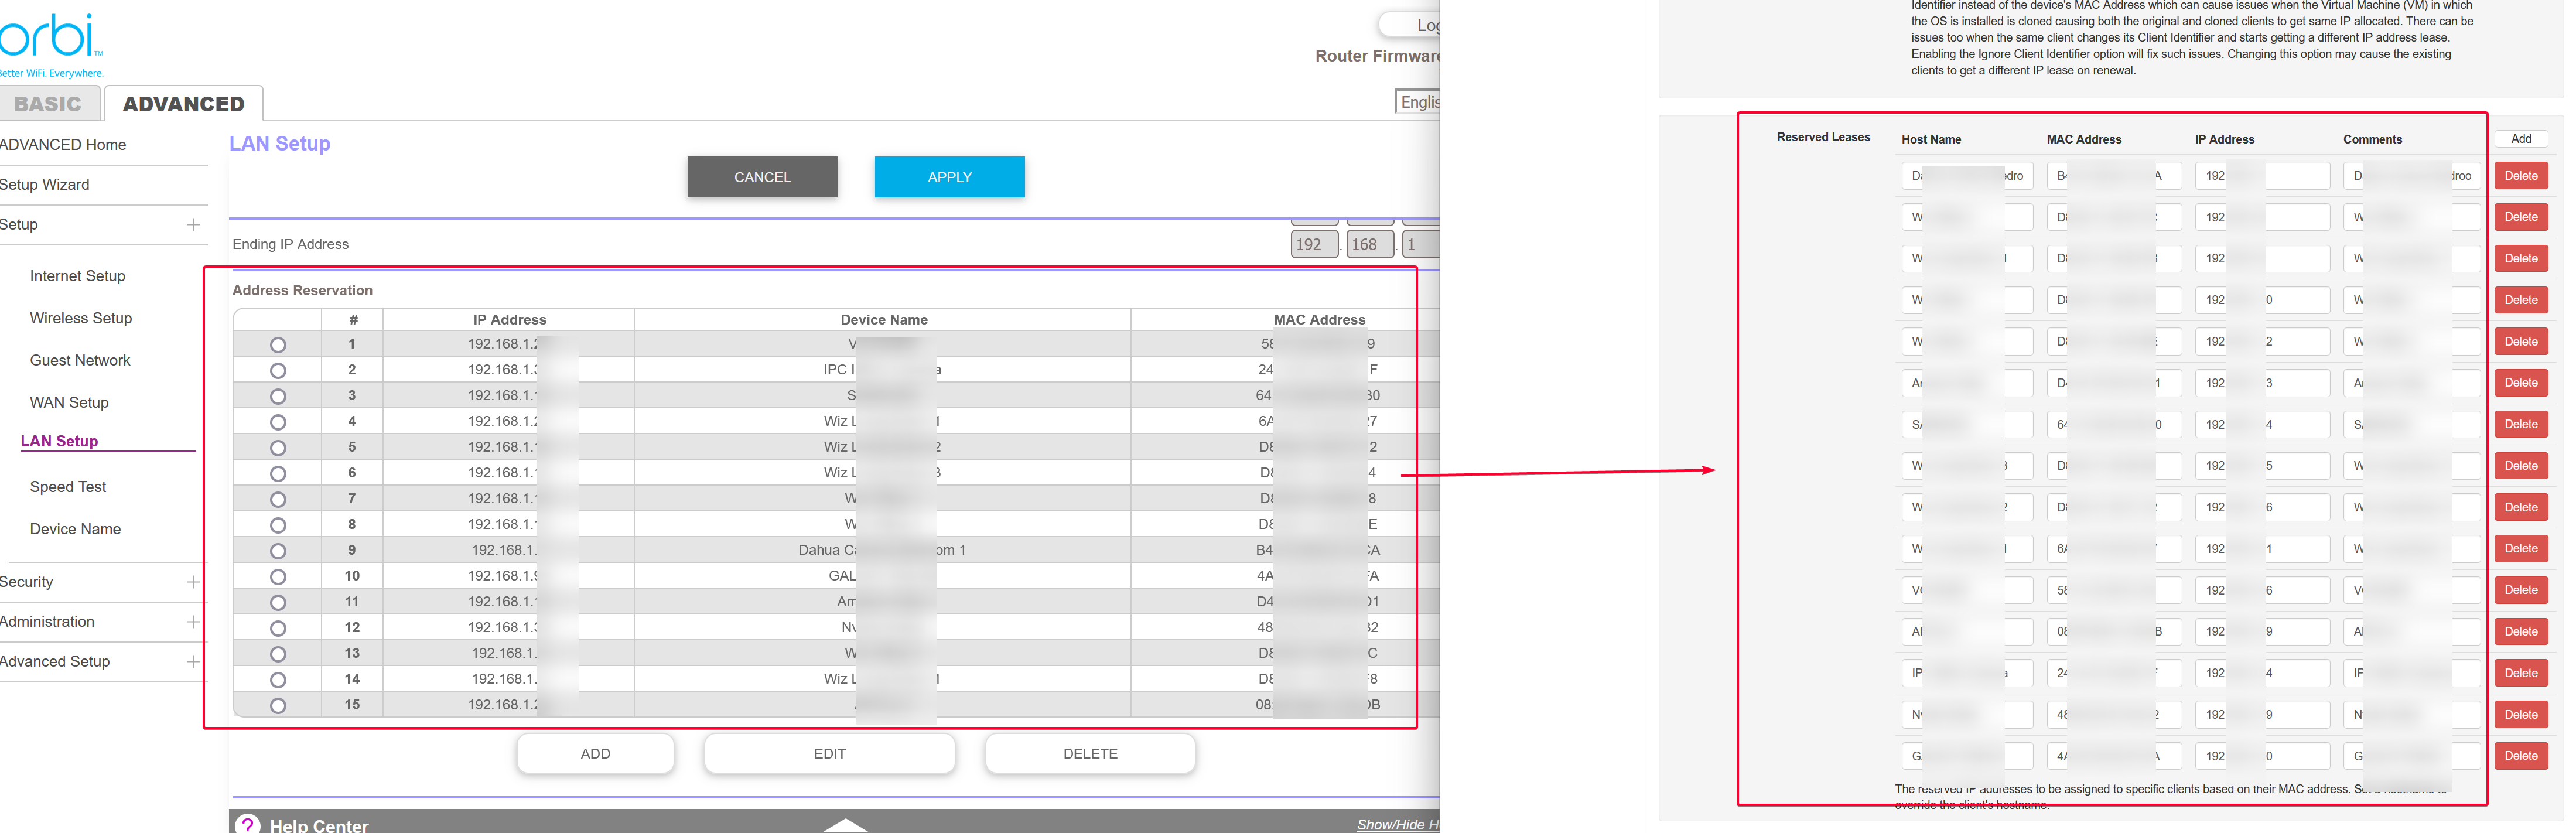
Copy any Address Reservation from your router (if any) to Technitium DHCP > Scopes . Scroll to the bottom to see the Reserved Leases section. The following shows the Address Reservation I set on my Orbi router and copying it to Technitium.
This is my list of clients that uses Technitium as their DNS server after enabling the DHCP server option.
Validation
To test, I simply query the DNS queries made from my Samsung Smart TV 192.168.1.14. I am surprise (also not surprise) to see it actually attempt to send logs to netflix! Fortunately these are blocked! Well I do have Netflix app installed but it’s not even running. That just shows how scary it is for many IoT device that secretly send data back to their server for data analytics. This is one highlight of using Technitium as the DNS server to block these attempts.

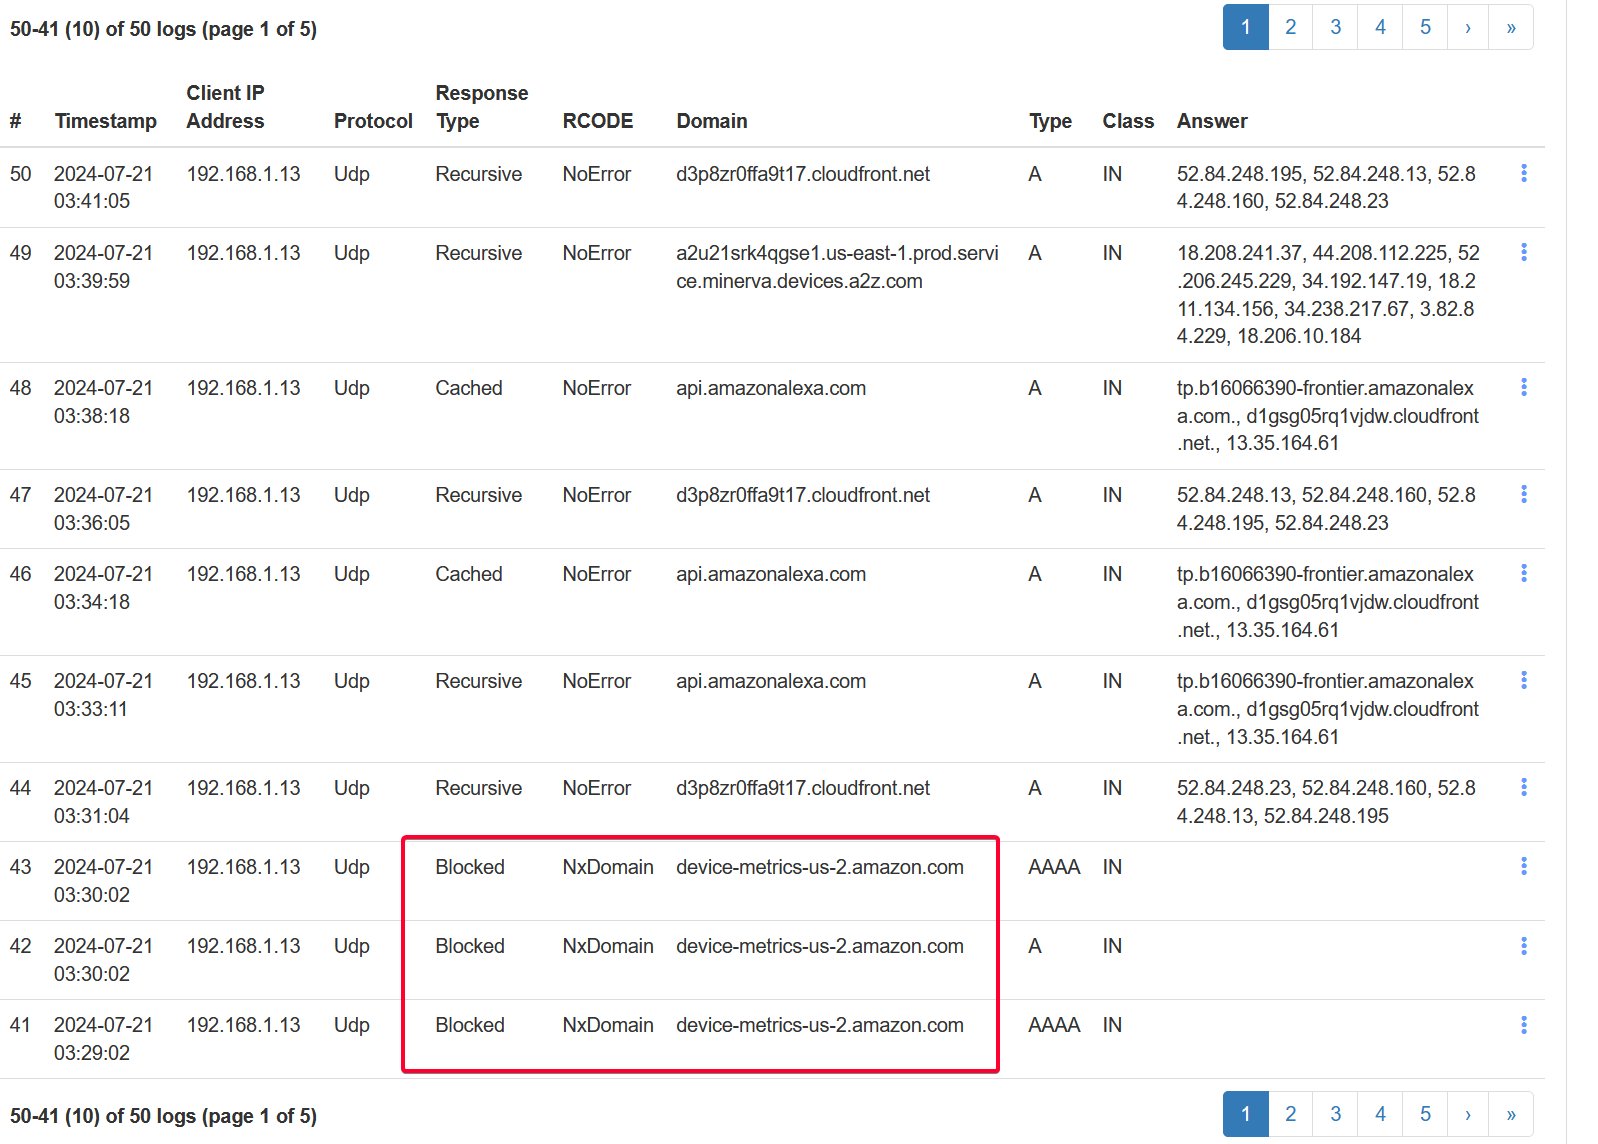
Another example of the packet blocked from my Amazon Echo Dot that sent to Amazon metric server for analytics.
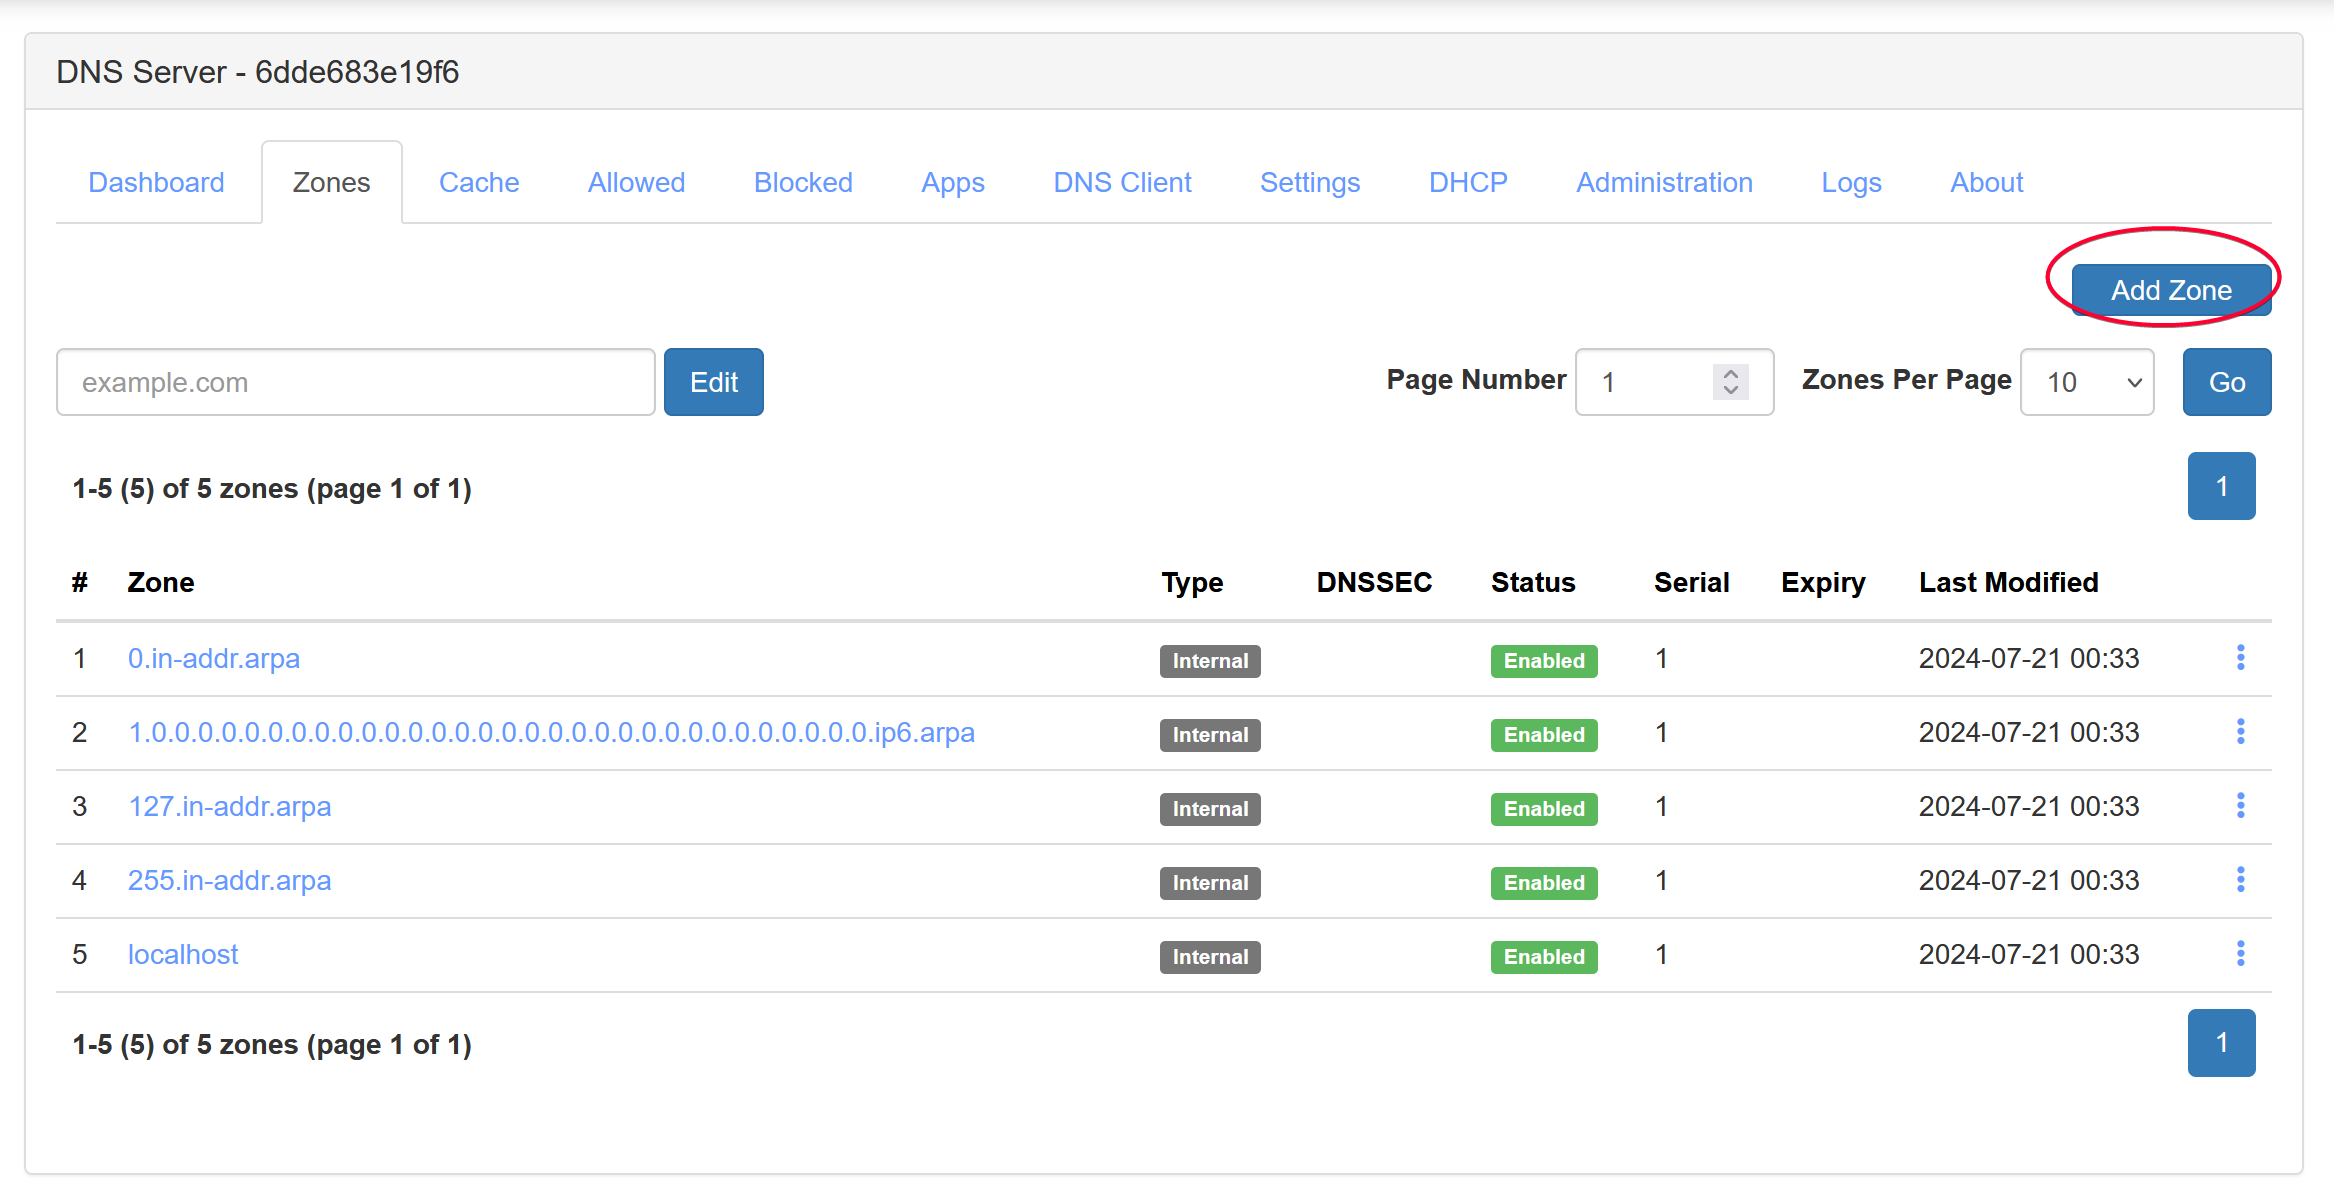
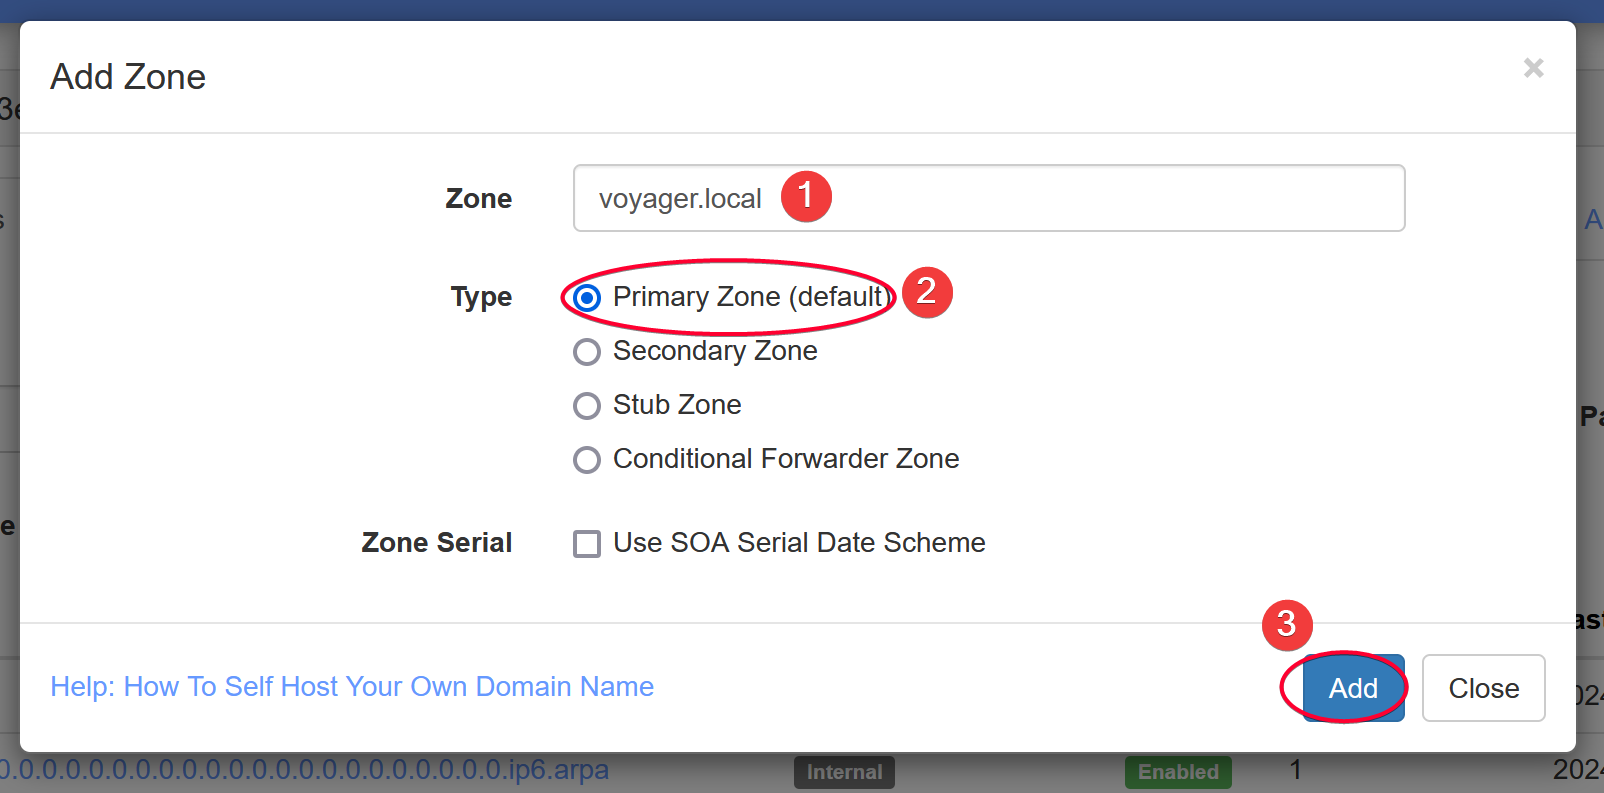
Create Zone for Your Home Domain
You can create a Zone that point any subdomain in that zone to any IP address in your network.
TIP
💡 Zone is where you point a subdomain to an IP address, e.g. unraid.mydomain.home to 192.168.1.22. Zone is NOT how you setup subdomain to point to a service with port, such as jellyfin.mydomain.home to https://192.168.1.22:8096. To point a subdomain to a service with schema and port, you must use Application Proxy (also called Layer 7 Proxy) such as Traefik or nginx being the commonly used ones. See my extensive guide on setting up Traefik reverse proxy here if you are interested.

Set Router to use Technitium DNS Server
Note
💡 I’m not sure if this is even needed. I ended up NOT doing it.
I’m using Orbi, so.